Showing posts with label cakes. Show all posts

March 21, 2011

Exciting new hobby!!


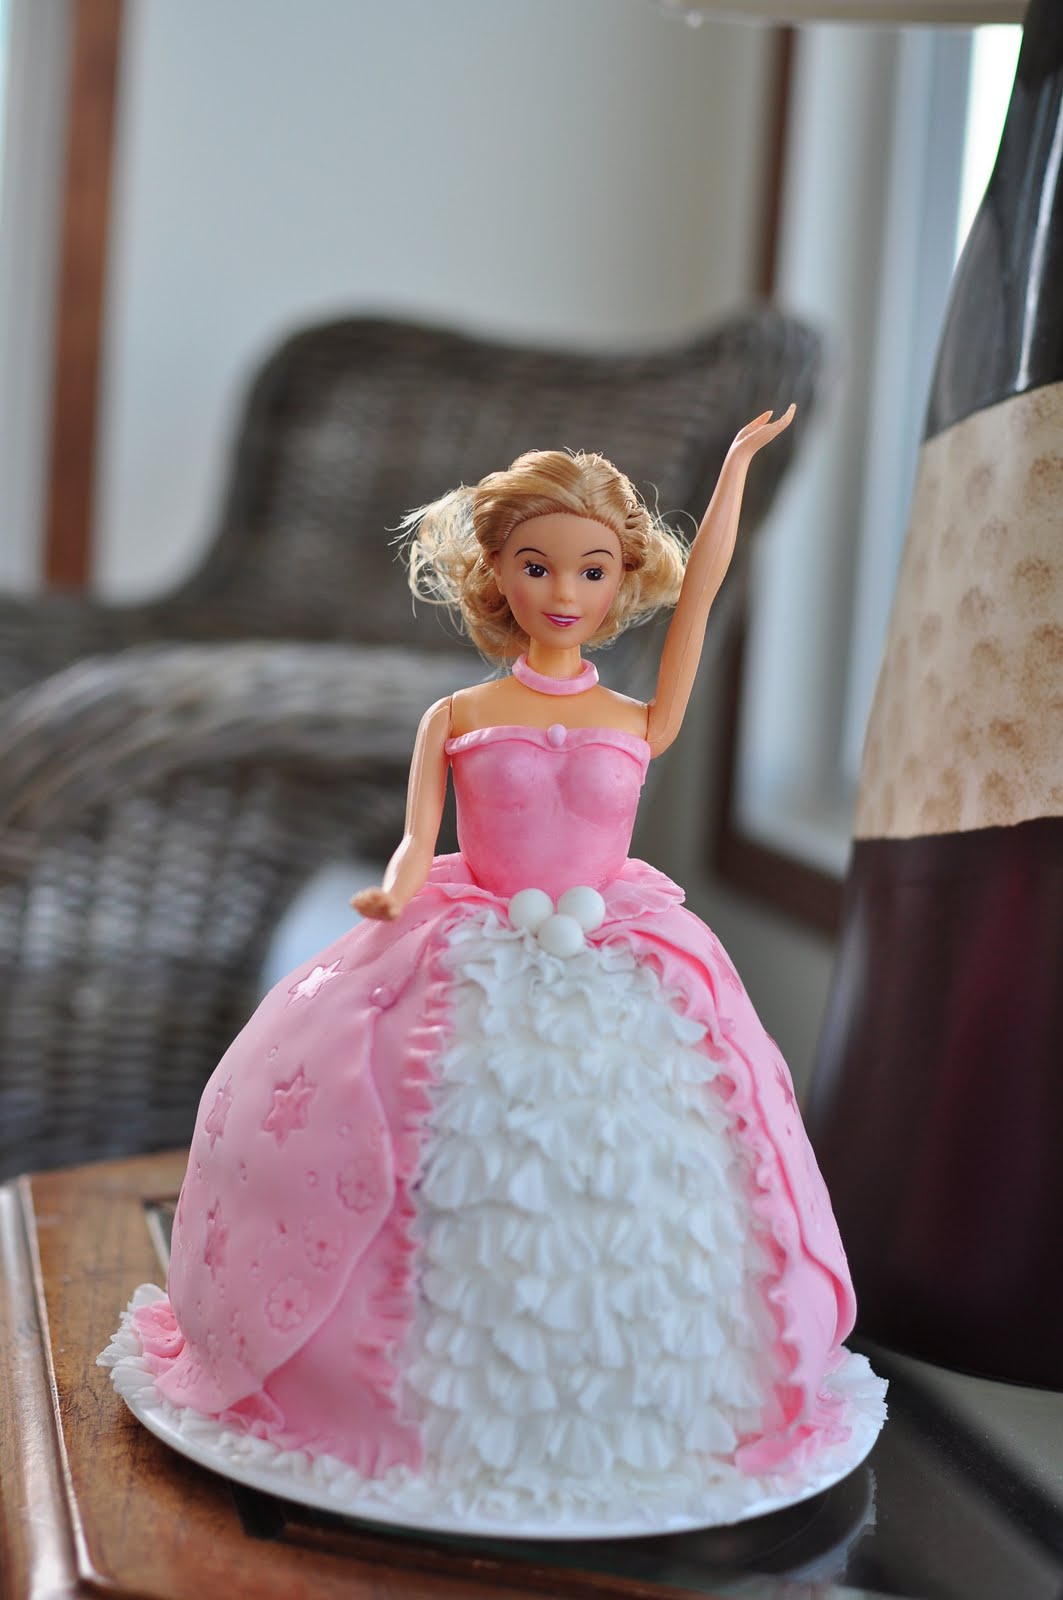
Hi All... I have a fun new exciting high- making birthday cakes!! Thanks to my friends Leslie and Sus, who trusted me enough to ask me to bake their daughters' birthday cakes! I had made a castle cake (made with 6 cakes) for my lil girl's birthday last year! I got very positive reviews after that but I wasn't bold enough to take any orders for the cake. But my friend Leslie thought that I should be able to make one for her lil girl who was turning 5 this month.


The first birthday girl wanted a princess with pink gown. I decided to do a yellow cake with strawberry preserves for the doll and a black forest cake with fondant (Wilton) covering to resemble a wrapped present, with the doll standing on top. The present cake was covered with a pastel pink fondant with bows, crullers and ribbon made out of white fondant. And thus my first ever doll and present cake was born! It turned out really well, and the guests were amazed and were kind enough to appreciate me!


The inspiration for the ruffled layers in the front of the doll came from a video of a cake on youtube and I searched for tutorials. Finally when I figured it out, I realised that it was a relatively easy and quick to master technique and yet gave breathtakingly beautiful and professional looking results!


For the crullers (fondant springs): Roll the fondant thin and make very thin long ribbons with a kinife. Drape the ribbon around the handle of a wooden spatula and allow to dry slightly. Slide the crullers off the handle gently and allow to harden completely.


I grew confident and I decided that I could accept a second cake order within a couple of weeks! Sus really liked pictures of the first cake and wanted a doll cake for her daughter too! But I changed the bottom of the second cake by covering it with buttercream (Wilton decorator's icing)icing with pink shells on the border and two toned roses.


The second doll was done pretty much similar to the first one except that the gown was of a slightly diferent pattern. I also tried using pearl dust (pink) on the gown and thats my new favorite cake decorating accessory!! The pearl dust gave such a beautiful sheen to the dress, I loved it! Its pretty easy to use - just mix with some vanilla extract and paint on! Pearls coated with shimmer dust also adorned the gown.


For the irrgeular green stringy leaves, pipe green tinted buttercream through a small round tip and allow to drop naturally on the cake. For two toned roses, apply gel coloring to the inside of the piping bag (on the narrow petal tip side of the bag). Pipe buttercream roses with icing tinted to a color lighter than the gel applied to the inside of the bag. I have sprinkled pink decoraring sugar on the cake. Also, put tiny drops of piping gel on the roses to resemble water drops.


Since I didnt take any pictures of how to make the ruffles during my first try, I took some this time. Hopefully someone else will find it useful! Please follow the basics of working with fondant - dust the work surface with confectioner's sugar, keeping the unused fondant covered. I did all my fondant work on a silpat mat.


Make crinkle cut outs from fondant. Cut the center of the cut outs using a smaller plain round cutter.


Take a tooth pick and press at the petal part of the cut out and roll it back and forth to thin out the area. Repeat through all the petals of the cut outs. Cut the ruffle ring along one petal and stretch to linearize.


Stick the ruffle to a crumb coated doll figurine. If attaching to a fondant covered surface, use little water to stick the ruffle to the fondant. I attached three of such ruffles to make the lowest layer of ruffle. Attach the second layer of ruffles overlapping the first (bottom). Repeat to cover the entire front of the doll. I did the next couple of layers with one ruffle each and then towards the top of the doll, one ruffle ring can be cut into two and stretched to make the top ruffle layers. Drape another layer of rolled fondant over the ruffles so as to cover the ends of the ruffles and make the gown.Decorate/punch designs on the drape before applying onto the cake.


I hand painted each star on the draped gown with the pearl dust, and also the ruffles. I am extremely happy with the results considering this is only my second doll cake!

I know I haven't covered everything in this post. So feel free to ask any questions that you might have, I would be happy to respond. Please do let me know your thoughts and suggestions on how I did!

Once again I am toasting to my new hobby! I just hope I would get enough time to be able to continue with it.... Cheers!!!

January 27, 2011

Biscuit Joconde Imprime for Daring Bakers- My 25th Challenge!!


The January 2011 Daring Bakers’ challenge was hosted by Astheroshe of the blog accro. She chose to challenge everyone to make a Biscuit Joconde Imprime to wrap around an Entremets dessert.

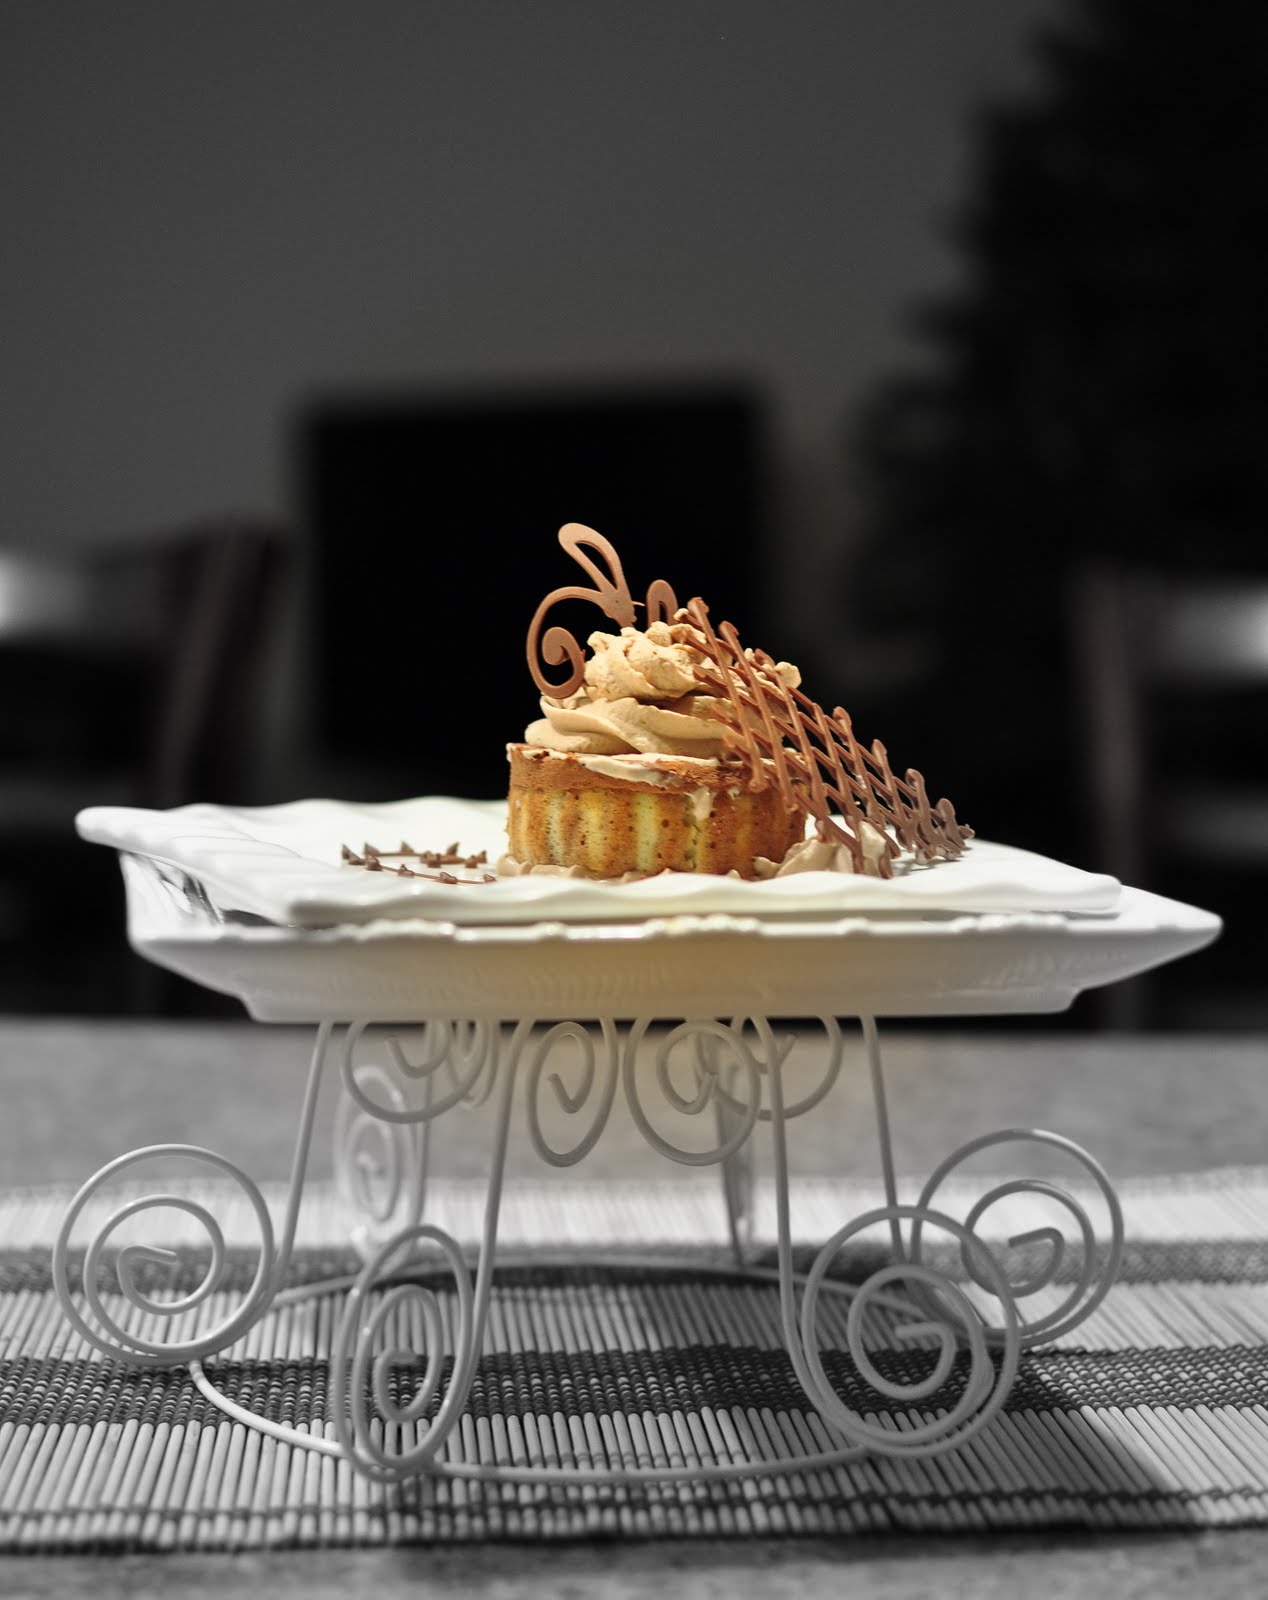
Here it is! My attempt at the Joconde imprime filled to make an entremet! This challenge was really exciting since this was something I've never done before! The patterns that I came across on the net were amazing and eventhough mine didnt turn out as good as I had hoped, I am still happy with my attempt. The whole process went fine, but what I learned is that if we are making a pattern with chocolate paste and plain cake mix, the chocolate paste has to be really dark to give stunning patterns. I just eyeballed the recipe and so ended up with light chocolate paste, which still gave good patterns. I made swirls, dots and stripes, both with brown and pink tinted paste, but the chocolate striped one turned out the best.

I loved learning the technique and am proud to have completed another daring challenge! :-)I filled the biscuit joconde with chocolate mousse and decorated it with chocolate whipped cream and chocolate art as garnishes!


Joconde Sponge

YIELD: Two ½ size sheet pans or a 13” x 18” (33 x 46 cm) jelly roll pan

Ingredients:
¾ cup/ 180 ml/ 3oz/ 85g almond flour/meal - *You can also use hazelnut flour, just omit the butter
½ cup plus 2 tablespoons/ 150 ml/ 2⅔ oz/ 75g confectioners' (icing) sugar
¼ cup/ 60 ml/ 1 oz/ 25g cake flour *See note below
3 large eggs - about 5⅓ oz/ 150g
3 large egg whites - about 3 oz/ 90g
2½ teaspoons/ 12½ ml/ ⅓ oz/ 10g white granulated sugar or superfine (caster) sugar
2 tablespoons/ 30 ml/ 1oz / 30g unsalted butter, melted


*Note: How to make cake flour: http://www.joythebaker.com/blog/2009/09/how-to-make-cake-flour/

Directions:

  1. In a clean mixing bowl whip the egg whites and white granulated sugar to firm, glossy peeks. Reserve in a separate clean bowl to use later.
  2. Sift almond flour, confectioner’s sugar, cake flour. (This can be done into your dirty egg white bowl)
  3. On medium speed, add the eggs a little at a time. Mix well after each addition. Mix until smooth and light. (If using a stand mixer use blade attachment. If hand held a whisk attachment is fine, or by hand. )
  4. Fold in one third reserved whipped egg whites to almond mixture to lighten the batter. Fold in remaining whipped egg whites. Do not over mix.
  5. Fold in melted butter.
  6. Reserve batter to be used later.

Patterned Joconde-Décor Paste

YIELD: Two ½ size sheet pans or a 13” x 18” (33 x 46 cm) jelly roll pan

Ingredients
14 tablespoons/ 210ml/ 7oz/ 200g unsalted butter, softened
1½ cups plus1½ tablespoons/ 385ml/ 7oz/ 200g Confectioners' (icing) sugar
7 large egg whites - about 7 oz / 200g
1¾ cup/ 420ml/ 7¾ oz/ 220g cake flour
Food coloring gel, paste or liquid

COCOA Décor Paste Variation: Reduce cake flour to 6 oz / 170g. Add 2 oz/ 60 g cocoa powder. Sift the flour and cocoa powder together before adding to creamed mixture.

Directions:

  1. Cream butter and sugar until light and fluffy (use stand mixer with blade, hand held mixer, or by hand)
  2. Gradually add egg whites. Beat continuously.
  3. Fold in sifted flour.
  4. Tint batter with coloring to desired color, if not making cocoa variation.

Preparing the Joconde- How to make the pattern:

  1. Spread a thin even layer of décor paste approximately 1/4 inch (5 millimeter) thick onto silicone baking mat with a spatula, or flat knife. Place mat on an upside down baking sheet. The upside down sheet makes spreading easier with no lip from the pan.
  2. Pattern the décor paste – Here is where you can be creative. Make horizontal /vertical lines (you can use a knife, spatula, cake/pastry comb). Squiggles with your fingers, zig zags, wood grains. Be creative whatever you have at home to make a design can be used. OR use a piping bag. Pipe letters, or polka dots, or a piped design. If you do not have a piping bag. Fill a ziplock bag and snip off corner for a homemade version of one.
      1. Slide the baking sheet with paste into the freezer. Freeze hard. Approx 15 minutes.
      2. Remove from freezer. Quickly pour the Joconde batter over the design. Spread evenly to completely cover the pattern of the Décor paste.
      3. Bake at 475ºF /250ºC until the joconde bounces back when slightly pressed, approx. 15 minutes. You can bake it as is on the upside down pan. Yes, it is a very quick bake, so watch carefully.
      4. Cool. Do not leave too long, or you will have difficulty removing it from mat.
      5. Flip cooled cake on to a powdered sugared parchment paper. Remove silpat. Cake should be right side up, and pattern showing! (The powdered sugar helps the cake from sticking when cutting.)


      6. Preparing the MOLD for entremets:

        You can use any type of mold. I would suggest:

      7. Start with a large piece of parchment paper laid on a very flat baking sheet. Then a large piece of cling wrap over the parchment paper. Place a spring form pan ring, with the base removed, over the cling wrap and pull the cling wrap tightly up on the outside of the mold. Line the inside of the ring with a curled piece of parchment paper overlapping top edge by ½ inch. CUT the parchment paper to the TOP OF THE MOLD. It will be easier to smooth the top of the cake.
      8. A biscuit cutter/ cookie cutter- using cling wrap pulled tightly as the base and the cling covering the outside of the mold, placed on a parchment lined very flat baking sheet. Line the inside with a curled piece of parchment paper overlapping.
      9. Cut PVC pipe from your local hardware store. Very cheap! These can be cut into any height you wish to make a mold. 2 to 3 inches is good. My store will cut them for me, ask an employee at your store. You can get several for matching individual desserts. Cling wrap and parchment line, as outlined above.


Check out all my previous Daring Baker challenges here. I am proud to have completed my 25th Daring Baker Challenge successfully!

Go DBers! Have a great day!

July 27, 2010

Swiss Swirl Icecream Cake for DB Challenge!


The July 2010 Daring Bakers’ challenge was hosted by Sunita of Sunita’s world – life and food. Sunita challenged everyone to make an ice-cream filled Swiss roll that’s then used to make a bombe with hot fudge. Her recipe is based on an ice cream cake recipe from Taste of Home.


I finally got around to attempting this challenge last weekend. I was disappointed that I couldn't do last month's challenge, so I made sure that I did this one.. The baking part with the two swiss rolls went fine. I should say that never before have my swiss rolls been this soft and tasty. I particularly loved the fact that the filling was light Chantilly cream and not the heavy over-sweet buttercream or jam! The only thing that I felt I would change was the amount of cream used because I felt that the recipe given kind of over-stuffed the roll. But nevertheless, it was delicious and light! I guess since I used a smaller bowl to assemble the icecream cake, almost the whole second roll was excess for me (no regrets there, anyways!!).


I didn't get to go too creative with the icecream flavors. I went with the recipes given kind of "settling" for the vanilla icecream and chocolate icecream as the two flavors (eventhough my longing was to make rose-flavored and pistachio flavored icecreams!!). I used icecream maker to make both icecreams! I really didnt like the taste of the fudge sauce alone, but everything came together in the end. I felt that it tasted just like it was- sweetend water with cocoa! Maybe it would have been better if we had made some chocolate ganache for the filling!


I assembled the cake slices and the vanilla icecream on Sunday. I also made the Chocolate icecream. I was planning to make the fudge sauce and assemble the rest of the cake on the evening before the challenge reveal date. Unfortunately, when I came back home I found that the freezer wasn't closed properly and that the cake/vanilla icecream was soft!!! I still made the fudge sauce, waited a while for it to cool down and keeping my fingers crossed added the slightly warm sauce on top the vanilla icecream! Ofcourse, there is a reason for every instruction in the recipe, the sauce melted the icecream a bit and kind of became gooey. But I just hoped that too much damage wasn't done. I waited for an hour, but the icecream/fudge had still not set, but I added the softened chocolate icecream on top and just hoped that I would still have the three separate layers when I cut into the icecream cake.


I had to wait till evening today so that the cake could harden and I could take pictures once I came back from work. The unmolding was quick, and I decorated the cake with some cherries, shaved chocolate and sugar-frosted cherries on top. My cake slices were not clean - maybe I should have partially frozen the swiss roll before cutting into slices which would have made lesser smearing of cream on the cake. But other than that everything looked good and I was happy with the icecream cake.


VERDICT: Today was the best day for this icecream cake because the weather was unbearably hot in MN and there even was a heat advisory!! The thought of the icecream cake got me through the harsh evening commute! The icecream cake was perfect for this hot day. It was delicious, sweet and cold, everything you would expect from an icecream cake. Maybe its just me, but I wasn't "wow"ed by it though! I felt that the cake was a little bland tasting once it absorbed a bit of moisture or maybe it was because of freeze thawing!? Who knows, maybe it was because my swirl slices almost completely thawed because of the freezer mishap! A delight for sure for the eyes because of its layers, but somehow didn't rise to my expectations. I honestly felt that the individual elements worked better for me separately... We would give a 7.5/10 for this cake..


But one thing is for sure, it was a hit with my daughter! She rarely asks for seconds (be it any kind of food, including desserts!) but she wanted an additional piece of the icecream cake!


Swiss roll ice cream cake


inspired by the recipe of the same name from the Taste of Home website)

Swiss rolls - Recipe

Preparation time- 10 minutes
Baking time- 10-12 minutes
Rolling and cooling time- at least 30 minutes
Filling-5-8 minutes
Filling and rolling- 5-10 minutes

Ingredients-

6 medium sized eggs
1 C / 225 gms caster sugar /8 oz+ extra for rolling
6 tblsp / 45gms/ a pinch over 1.5 oz of all purpose (plain) flour + 5 tblsp/40gm /a pinch under 1.5 oz of natural unsweetened cocoa powder, sifted together
2 tblsp /30ml / 1 fl oz of boiling water
a little oil for brushing the pans

For the filling-

2C / 500 mls/ 16 fl oz of whipping cream
1 vanilla pod, cut into small pieces of about ½ cm (or 1 tsp vanilla extract)
5 tblsp / 70gms/2.5oz of caster sugar

Method-

1. Pre heat the oven at 200 deg C /400 deg F approximately. Brush the baking pans ( 11 inches by 9 inches ) with a little oil and line with greaseproof baking paper. If you have just one pan, bake one cake and then let the pan cool completely before using it for the next cake.

2. In a large mixing bowl, add the eggs and sugar and beat till very thick; when the beaters are lifted, it should leave a trail on the surface for at least 10 seconds.

3. Add the flour mixture, in three batches and fold in gently with a spatula. Fold in the water.


4. Divide the mixture among the two baking pans and spread it out evenly, into the corners of the pans.

5. Place a pan in the centre of the pre heated oven and bake for about 10-12 minutes or till the centre is springy to the touch.

6. Spread a kitchen towel on the counter and sprinkle a little caster sugar over it.

7. Turn the cake on to the towel and peel away the baking paper. Trim any crisp edges.

8. Starting from one of the shorter sides, start to make a roll with the towel going inside. Cool the wrapped roll on a rack, seam side down.

9. Repeat the same for the next cake as well.

10. Grind together the vanilla pieces and sugar in a food processer till nicely mixed together. If you are using vanilla extract, just grind the sugar on its own and then add the sugar and extract to the cream.

11. In a large bowl, add the cream and vanilla-sugar mixture and beat till very thick.

12. Divide the cream mixture between the completely cooled cakes.

13. Open the rolls and spread the cream mixture, making sure it does not go right to the edges (a border of ½ an inch should be fine).

14. Roll the cakes up again, this time without the towel. Wrap in plastic wrap and chill in the fridge till needed, seam side down.


Vanilla ice cream

Preparation time-5 minutes+freezing

Ingredients-

2 and ½ C / 625 ml / 20 fl oz of whipping cream
1 vanilla bean, minced or 1 tsp/ 5 ml/ .15 fl oz vanilla extract
½ C / 115gms/ 4 oz of granulated sugar

Method-

1. Grind together the sugar and vanilla in a food processor. In a mixing bowl, add the cream and vanilla –sugar mixture and whisk lightly till everything is mixed together. If you are using the vanilla extract, grind the sugar on its own and then and the sugar along with the vanilla extract to the cream.

2. Pour into a freezer friendly container and freeze till firm around the edges. Remove from the freezer, beat till smooth and return to the freezer. Do this 3-4 times and then set completely.

Hot fudge sauce

Preparation time-2 minutes
Cooking time-2 minutes

Ingredients-

1 C / 230gms/ 8 oz of caster sugar
3 tblsp / 24gms/1.5 oz of natural unsweetened cocoa powder
2 tblsp /15gms/ 1 oz of cornflour/cornstarch
1 and ½ C /355ml /12 fl oz of water
1 tblsp /14gms/ 1 oz butter
1 tsp/5 ml / .15 fl oz vanilla extract

Method-

1. In a small saucepan, whisk together the sugar, cocoa powder, cornflour and water.

2. Place the pan over heat, and stir constantly, till it begins to thicken and is smooth (for about 2 minutes).

3. Remove from heat and mix in the butter and vanilla. Keep aside to cool .


Chocolate ice cream

Preparation time- 5 minutes + freezing

Ingredients-

2C/ 500 ml whipping cream
1 C/230gms/8 oz caster sugar
3 tblsp/ 24 gms/1.5 oz of natural unsweetened cocoa powder

Method-

1. Grind together the sugar and the cocoa powder in a food processor .

2. In a saucepan, add all the ingredients and whisk lightly.

3. Place the pan over heat and keep stirring till it begins to bubble around the edges.

4. Remove from heat and cool completely before transferring to a freezer friendly container till firm around the edges. If you are using an ice cream maker, churn the ice cream according to the manufacturer’s instruction, after the mixture has cooled completely.

5. Remove from the freezer, beat till smooth and return to the freezer. Do this 3-4 times and then set completely.


Assembly

1. Cut the Swiss rolls into 20 equal slices ( approximately 2 cms each ).

2. Cover the bottom and sides of the bowl in which you are going to set the dessert with cling film/plastic wrap.

3. Arrange two slices at the bottom of the pan, with their seam sides facing each other. Arrange the Swiss roll slices up the bowl, with the seam sides facing away from the bottom, to cover the sides of the bowl. Cover the bowl with plastic wrap and freeze till the slices are firm (at least 30 minutes).

4. Soften the vanilla ice cream. Take the bowl out of the freezer, remove the cling film cover and add the ice cream on top of the cake slices. Spread it out to cover the bottom and sides of the bowl. Cover the bowl with plastic wrap and freeze till firm ( at least 1 hour).

5. Add the fudge sauce over the vanilla ice cream, cover and freeze till firm . ( at least an hour).

6. Soften the chocolate ice cream and spread it over the fudge sauce. Cover with plastic wrap and freeze for at least 4-5 hours till completely set .

7. Remove the plastic cover, and place the serving plate on top of the bowl. Turn it upside down and remove the bowl and the plastic lining. If the bowl does not come away easily, wipe the outsides of the bowl with a kitchen towel dampened with hot water. The bowl will come away easily.

8. Keep the cake out of the freezer for at least 10 minutes before slicing, depending on how hot your region is. Slice with a sharp knife, dipped in hot water.


Thank you Sunita, for a wonderful and interesting challenge!


style="font-family:trebuchet ms;">Thanks for visiting me today! Have a great week ahead! I will be back soon with the decorating details of a cake that I made for a dinner party!!

August 27, 2009

Dobos Torte - A Hungarian treat!

The August 2009 Daring Bakers' challenge was hosted by Angela of A Spoonful of Sugar and Lorraine of Not Quite Nigella. They chose the spectacular Dobos Torte based on a recipe from Rick Rodgers' cookbook Kaffeehaus: Exquisite Desserts from the Classic Caffés of Vienna, Budapest, and Prague.

So, what is the Dobos Torta (or Torte) ? The Dobos Torta is a five-layer sponge cake, filled with a rich chocolate buttercream and topped with thin wedges of caramel. (You may come across recipes which have anywhere between six and 12 layers of cake; there are numerous family variations!) It was invented in 1885 by József C. Dobos, a Hungarian baker, and it rapidly became famous throughout Europe for both its extraordinary taste and its keeping properties. The recipe was a secret until Dobos retired in 1906 and gave the recipe to the Budapest Confectioners' and Gingerbread Makers' Chamber of Industry, providing that every member of the chamber can use it freely.


I was really excited about this challenge and attempted it early in the month. Once again, because of time constraints, I decided to go with individual servings of the cake. I halved the cake recipe and the buttercream recipe in half. The individual layers were baked separately. I marked 10 circles on parchment paper using a 2 1/2" round cookie cutter. About 1/4 cup of cake batter was spread on the parchment paper a bit larger than the cookie cutter outline. The cake circles were baked until they turned golden brown along the edges. The excess batter was spread as a rectangle for the cake-topper cutouts. Once the cake circles were baked and cooled, they were cut-out into uniform circles using the 2 1/2" cookie cutter so that the circles were uniform and even.

The preparation of buttercream went well, but I felt that the buttercream was a bit too thin (liquid-y). I refrigerated the buttercream for quite a bit before spreading. The circles were stacked on top of each other with a layer of buttercream icing in between. Because the buttercream was so soft it was tough holding the stacks together. I put the cake stacks in the freezer for a while. Once they were manageable, I put a toothpick through the center to hold the layers together.

The cake was frozen most of the time before it was eaten. I could really make the buttercream smooth and beautiful while decorating but I decided to put a ribbon around the cake just for presentation purposes. One of the stacks were done with a ribbon around it, and the other was done with two thin strips of ribbons.

I wanted the caramel coated cake piece to be stiff so that it would stand up on top of the cake. Instead of the caramel covered cake wedges, I cut out a piece of cake from the rectangle cake made from the excess batter and coated in caramel. The caramel was made by heating sugar with a bit of water until the melted sugar turned dark brown. The caramel was poured on top of the cake cut-out and allowed to harden.

The cakes were decorated with the caramel cake cut-out, chocolate pipings, chopped and whole hazelnuts and chopped almonds.

VERDICT:

We really enjoyed the Dobos torte, it was amazing!! They were actually fun to assemble, except for the fact that the buttercream was a little too soft. But it was sooooo delicious. This is the first time that I made buttercream icing with eggs. The flavors went well together especially the buttercream and the hazelnut combo. JM mentioned that he wouldve loved a bit of chopped hazelnuts between each cake layer. The whole thing was so delicious, our individual cakes disappeared in a couple of minutes. My only suggestion would be to moisten the cake layers with a flavored syrup/juice before stacking, as I found them a little chewy and dry. But all in all, the textures and the flavors went extremely well together especially the toasted hazelnuts with the buttercream icing. One more amazing challenge that I am happy about!!

I had some buttercream icing left over which LM really enjoyed the nest day as an awesome bread-spread, yes a spread for bread!! Actually I enjoyed the sandwich just as much as lil LM.


Equipment

  • 2 baking sheets
  • 9” (23cm) springform tin and 8” cake tin, for templates
  • mixing bowls (1 medium, 1 large)
  • a sieve
  • a double boiler (a large saucepan plus a large heat-proof mixing bowl which fits snugly over the top of the pan)
  • a small saucepan
  • a whisk (you could use a balloon whisk for the entire cake, but an electric hand whisk or stand mixer will make life much easier)
  • metal offset spatula
  • sharp knife
  • a 7 1/2” cardboard cake round, or just build cake on the base of a sprinfrom tin.
  • piping bag and tip, optional

Prep times

  • Sponge layers 20 mins prep, 40 mins cooking total if baking each layer individually.
  • Buttercream: 20 mins cooking. Cooling time for buttercream: about 1 hour plus 10 minutes after this to beat and divide.
  • Caramel layer: 10-15 minutes.
  • Assembly of whole cake: 20 minutes

Sponge cake layers

  • 6 large eggs, separated, at room temperature
  • 1 1/3 cups (162g) confectioner's (icing) sugar, divided
  • 1 teaspoon (5ml) vanilla extract
  • 1 cup plus 2 tablespoons (112g) sifted cake flour (SUBSTITUTE 95g plain flour + 17g cornflour (cornstarch) sifted together)
  • pinch of salt

Chocolate Buttercream

  • 4 large eggs, at room temperature
  • 1 cup (200g) caster (ultrafine or superfine white) sugar
  • 4oz (110g) bakers chocolate or your favourite dark chocolate, finely chopped
  • 2 sticks plus 2 tablespoons (250g) unsalted butter, at room temperature.

Caramel topping

  • 1 cup (200g) caster (superfine or ultrafine white) sugar
  • 12 tablespoons (180 ml) water
  • 8 teaspoons (40 ml) lemon juice
  • 1 tablespoon neutral oil (e.g. grapeseed, rice bran, sunflower)

Finishing touches

  • a 7” cardboard round
  • 12 whole hazelnuts, peeled and toasted
  • ½ cup (50g) peeled and finely chopped hazelnuts

Directions for the sponge layers:

NB. The sponge layers can be prepared in advance and stored interleaved with parchment and well-wrapped in the fridge overnight.

1.Position the racks in the top and centre thirds of the oven and heat to 400F (200C).

2.Cut six pieces of parchment paper to fit the baking sheets. Using the bottom of a 9" (23cm) springform tin as a template and a dark pencil or a pen, trace a circle on each of the papers, and turn them over (the circle should be visible from the other side, so that the graphite or ink doesn't touch the cake batter.)

3.Beat the egg yolks, 2/3 cup (81g) of the confectioner's (icing) sugar, and the vanilla in a medium bowl with a mixer on high speed until the mixture is thick, pale yellow and forms a thick ribbon when the beaters are lifted a few inches above the batter, about 3 minutes. (You can do this step with a balloon whisk if you don't have a mixer.)

4.In another bowl, using clean beaters, beat the egg whites until soft peaks form. Gradually beat in the remaining 2/3 cup (81g) of confectioner's (icing) sugar until the whites form stiff, shiny peaks. Using a large rubber spatula, stir about 1/4 of the beaten whites into the egg yolk mixture, then fold in the remainder, leaving a few wisps of white visible. Combine the flour and salt. Sift half the flour over the eggs, and fold in; repeat with the remaining flour.

5.Line one of the baking sheets with a circle-marked paper. Using a small offset spatula, spread about 3/4 cup of the batter in an even layer, filling in the traced circle on one baking sheet. Bake on the top rack for 5 minutes, until the cake springs back when pressed gently in the centre and the edges are lightly browned. While this cake bakes, repeat the process on the other baking sheet, placing it on the centre rack. When the first cake is done, move the second cake to the top rack. Invert the first cake onto a flat surface and carefully peel off the paper. Slide the cake layer back onto the paper and let stand until cool. Rinse the baking sheet under cold running water to cool, and dry it before lining with another parchment. Continue with the remaining papers and batter to make a total of six layers. Completely cool the layers. Using an 8" springform pan bottom or plate as a template, trim each cake layer into a neat round. (A small serrated knife is best for this task.)


Directions for the chocolate buttercream:

NB. This can be prepared in advance and kept chilled until required.

1.Prepare a double-boiler: quarter-fill a large saucepan with water and bring it to a boil.

2.Meanwhile, whisk the eggs with the sugar until pale and thickened, about five minutes. You can use a balloon whisk or electric hand mixer for this.

3.Fit bowl over the boiling water in the saucepan (water should not touch bowl) and lower the heat to a brisk simmer. Cook the egg mixture, whisking constantly, for 2-3 minutes until you see it starting to thicken a bit. Whisk in the finely chopped chocolate and cook, stirring, for a further 2-3 minutes.

4.Scrape the chocolate mixture into a medium bowl and leave to cool to room temperature. It should be quite thick and sticky in consistency.

5.When cool, beat in the soft butter, a small piece (about 2 tablespoons/30g) at a time. An electric hand mixer is great here, but it is possible to beat the butter in with a spatula if it is soft enough. You should end up with a thick, velvety chocolate buttercream. Chill while you make the caramel topping.

Lorraine's note: If you're in Winter just now your butter might not soften enough at room temperature, which leads to lumps forming in the buttercream. Male sure the butter is of a very soft texture I.e. running a knife through it will provide little resistance, before you try to beat it into the chocolate mixture. Also, if you beat the butter in while the chocolate mixture is hot you'll end up with more of a ganache than a buttercream!

Directions for the caramel topping:

1.Choose the best-looking cake layer for the caramel top. To make the caramel topping: Line a jellyroll pan with parchment paper and butter the paper. Place the reserved cake layer on the paper. Score the cake into 12 equal wedges. Lightly oil a thin, sharp knife and an offset metal spatula.

2.Stir the sugar, water and lemon juice in a small saucepan. Bring to a boil over a medium heat, stirring often to dissolve the sugar. Once dissolved into a smooth syrup, turn the heat up to high and boil without stirring, swirling the pan by the handle occasionally and washing down any sugar crystals on the sides of the pan with a wet brush until the syrup has turned into an amber-coloured caramel.

3.The top layer is perhaps the hardest part of the whole cake so make sure you have a oiled, hot offset spatula ready. I also find it helps if the cake layer hasn't just been taken out of the refrigerator. I made mine ahead of time and the cake layer was cold and the toffee set very, very quickly—too quickly for me to spread it. Immediately pour all of the hot caramel over the cake layer. You will have some leftover most probably but more is better than less and you can always make nice toffee pattern using the extra to decorate. Using the offset spatula, quickly spread the caramel evenly to the edge of the cake layer. Let cool until beginning to set, about 30 seconds. Using the tip of the hot oiled knife (keep re-oiling this with a pastry brush between cutting), cut through the scored marks to divide the caramel layer into 12 equal wedges. Cool another minute or so, then use the edge of the knife to completely cut and separate the wedges using one firm slice movement (rather than rocking back and forth which may produce toffee strands). Cool completely.

Angela's note: I recommend cutting, rather than scoring, the cake layer into wedges before covering in caramel (reform them into a round). If you have an 8” silicon round form, then I highly recommend placing the wedges in that for easy removal later and it also ensures that the caramel stays on the cake layer. Once set, use a very sharp knife to separate the wedges.

Assembling the Dobos

1.Divide the buttercream into six equal parts.

2.Place a dab of chocolate buttercream on the middle of a 7 1/2” cardboard round and top with one cake layer. Spread the layer with one part of the chocolate icing. Repeat with 4 more cake layers. Spread the remaining icing on the sides of the cake.

3.Optional: press the finely chopped hazelnuts onto the sides of the cake.

4.Propping a hazelnut under each wedge so that it sits at an angle, arrange the wedges on top of the cake in a spoke pattern. If you have any leftover buttercream, you can pipe rosettes under each hazelnut or a large rosette in the centre of the cake. Refrigerate the cake under a cake dome until the icing is set, about 2 hours. Let slices come to room temperature for the best possible flavour.

Storage

I (Angela) am quite happy to store this cake at room temperature under a glass dome, but your mileage may vary. If you do decide to chill it, then I would advise also using a glass dome if you have done. I should also note that the cake will cut more cleanly when chilled.


Variations

Shape: The traditional shape of a Dobos Torta is a circular cake, but you can vary the shape and size if you want. Sherry Yard in Desserts By The Yard makes a skyscraper Dobos by cutting a full-size cake into four wedges and stacking them to create a tall, sail-shaped cake. Mini Dobos would be very cute, and you could perch a little disc of caramel on top.

Flavour: While we both love the dark chocolate buttercream and this is traditional, we think it would be fun to see what fun buttercreams you all come up with! So, go wild! Or, you could brush each layer with a flavoured syrup if you just want a hint of a second flavour. Cointreau syrup would be divine!

Nuts: These are optional for decoration, so no worries if you're allergic to them. If you don't like hazelnuts, then substitute for another variety that you like.

Egg concerns

The cooking process for the buttercream will produce lightly cooked eggs. If you fall into a vulnerable health group then you may wish to use an egg-less buttercream.

Hope you all liked my version of Dobos torte. If you would like to see how I did in my previous DB challenges, click here. Please do take a moment to go through some of the fellow DB members blogs.

Thank you for visiting me today. Have a great day!!


July 17, 2009

Pineapple Upside-down Cake


Hello and welcome back to Tasty treats!! I sure do miss posting more on this blog, but my work is taking up most of the time and I dont get to try out new recipes very often nowadays. But when I do, I make sure to take some pictures so that I can share it with you all.

Pineapple upside-down cake is one of those special cakes that I remeber from when I was young. My aunt used to bake it once-in-a-while and I remember that the name used to intrigue me! Eventhough it was like an exotic cake back then, I never got around to trying it out myself when I started baking. But finally I got a good recipe from a cookbook and I made this pineapple upside-down cake during the 4th of July weekend, when we had some friends come over to our place for a lunch get-together. I had baked the cake the day before, with two extra single serve cakes in ramekins so that we didnt have to wait until the next day to try it.

Just as soon as the picture session was over, we dived into our ramekin single serve cake shares. I must say, I really enjoyed the caramelised taste of the melted brown sugar and butter over the pineapple slices. The cake was really soft and delicate - the kind thats fluffy and delicious, with the caramelized pineapple piece in each mouthful. The reviews from JM indicated that he also enjoyed it really well. But unfortunately, I fell sick when the guests came over the next day and I was in bed!!!! So I had to forfeit the pleasure of serving the 8" cake and my guests served themselves. From what I could see, they really enjoyed the cake as well, with their little boy happily eating the cake. My friend asked for the recipe, the biggest acknowledgement of all.....

Hope you enjoyed the rceipe. Give this recipe a try and enjoy!!

Recipe (Makes 8 servings) :

Pineapple slices in juice - 2 cans (8oz each)
Butter or margarine - 8 tbsp (1 stick), softened
Brown sugar - 1/3 cup, packed
Cake flour (not self rising) - 1 cup
Baking powder - 1 tsp

Salt - 1/4 tsp
Granulated sugar - 2/3 cup
Egg - 1, large
Vanilla extract - 1 tsp
Milk - 1/3 cup


Method:

Preheat oven to 325F.

Drain pineapple slices in sieve set over bowl. Reserve 2 tbsp juice.

Cut 8 slices in half and drain on paper towels. Refrigerate remaining slices for another use.

In a 10" oven-safe skillet, melt 2 tbsp butter and brown sugar over medium heat, stirring until smooth.

Stir in reserved pineapple juice and heat to boiling; boil 1 minute.

Remove skillet from heat.

Decoratively arrange pineapple in skillet, overlapping slices slightly to fit.

In a small bowl, with fork, mix flour, baking powder and salt, set aside.

In a large bowl, with mixer at high speed, beat the remaining 6 tbsp butter and granulated sugar until fluffy, frequently scraping the bowl with a spatula.

Reduce speed to low, beat in egg and vanilla until well blended.

Add flour mixture alternately with milk, beginning and ending with flour mixture.

Beat just until blended.

Spoon batter over pineapple, spread evenly.

Bake until toothpick inserted in the center comes out clean; 40-45 minutes.

Immediately run a thin knife around the edges to loosen cake from the side of the skillet.

Invert cake onto serving plate. (If any pineapple slices stick to the skillet, remove and replace on cake).

Cook 30 minutes to serve warm, or cool completely to serve later.


Source : Good Housekeeping Best Loved Desserts.


Tips:
  1. I used a 20 oz can of pineapple rings.
  2. Instead of baking in a skillet, I used an 8" round cake pan and 2 ramekins.
  3. I didnt cut the pineapple rings in half, but used about 7 whole slices to line the base of the 8" cake pan and 2 more in the ramekins.
  4. The cherries were placed in the middle of the pineapple slices after baking, for presentation.
  5. I served the cake with a scoop of icecream on the side, though I should say, it tastes awesome just as is.

Hope you all enjoyed the recipe for today. Have a great day and an awesome weekend!!

July 10, 2009

Molten Chocolate Cake

Good morning everyone! Hope you all had a great 4th Of July weekend! We had music and fireworks at a performance center near our home and eventhough we didnt go, we could see the fireworks from our patio!! It was really amazing, I really enjoyed it.

I had planned to post this cake last week, but unexpectedly got really sick. So I was in bed the whole weekend (darn!). But I went to work for a couple of days this week and so is taking today off. Sadly lil LM and JM are sick as well, so all's not well.


Anyways, this is a molten cake recipe that I tried a couple of weeks ago. It is also known as molten lava cake. The cake is very simple to prepare and as the name suggests, the cake will only be cooked for about 5-10 minutes so that the edges will be set. But when you cut into the cake, the center will still be liquid and will flow out of the cake in a chocolate-y ooey gooey lava. The recipe given is for 8 individual cakes, but I halved the recipe and made only 3 cakes. I let them bake in the oven for the 8 mintes mentioned in the recipe, but that almost cooked through the cake. So in my understanding, if you are making the entire recipe, bake for 8-9 minutes and if reducing the recipe, reduce the time accordingly. Slightly moist interior can be found in the last set of pictures.

Eventhough the center didnt flow out when cut into, the cake wasnt cooked dry, so each bite was really moist, creamy and decadent. It was unlike any cake that I've had before. It sure was melt-in-your-mouth goodness!! Give this recipe a try, and I'm sure you all will love it!


Recipe ( Makes 8 servings) :

Semi sweet chocolate - 4 squares (4oz), chopped
Butter or margarine - 1/2 cup (1 stick), cut into pieces
Heavy or whipping cream - 1/4 cup
Vanilla extract - 1/2 tsp
All-purpose flour - 1/4 cup
Granulated sugar - 1/4 cup
Eggs - 2, large
Egg yolks - 2, large
Confectioner's sugar - for dusting
Whipped cream or Vanilla icecream (optional)

Method:

Preheat oven to 400F. Grease eight 6 oz custard cups. Dust with sugar.

In a heavy saucepan, heat chocolate, butter and cream over low heat, stirring occasionally, until butter and chocolate have melted and the mixture is smooth.

Remove pan from heat and add vanilla extract.

With a wire whisk, stir in flour just until the mixture is smooth.

In a medium bowl, with mixer at high speed, beat granulated sugar, eggs and yolk until thick and lemon colored, about 10 minutes.

Fold egg mixture into chocolate mixture, one third at a time, until blended.

Divide the batter evenly between the custard cups.

Place cups in jelly-roll pan for easier handling.

Bake until edges of cakes are set but the centers still jiggle, about 8-9 minutes.

Cool in pan on a wire rack for 3 minutes.

Run a knife around the edges to loosen cakes from the sides of cups, invert onto dessert plates.

Dust with confectioners' sugar.

Serve immediately with whipped cream or icecream, if desired.

Source: Good Housekeeping Best Loved Desserts.


Tips:
  1. I only made half the recipe, just reduced all the ingredients by half.
  2. Reduce the baking time to 6 minutes or so (if you halve the recipe), since my cakes turned out almost well cooked. One of them was still moist inside, but the others were cooked through. But still they were creamy and decadent once in the mouth!! :-)
Stay healthy and have a great weekend!!


ATTENTION:

Some of you contacted me about the fact that you cannot open my blog with Internet explorer. I am having the same problem with error messages coming up everytime. I am currently using a different browser. Earlier on, refreshing the page a couple of times helped. If anybody knows what the problem could be, I would really appreciate the help. I am so sorry for the inconvenience. Thank you!

May 13, 2009

Iced Chocolate Nut Gateau


I have been eyeing this dessert since I bought the "Desserts 500 delicious recipes" book. It has all the stuff that I love - its sweet, its frozen, it has nuts and whipped cream with delicious sponge fingers. I finally got a chance to make it last weekend. My dad was visiting us from my brother's in Seattle, on his way back to India. I took it as a chance to try out a new dessert as it was an excellent chance to divide the calories ;-).... Am I evil, well, I dont think so! It was an awesome dessert, perfectly sweetened and light. The whipped cream made fresh at home and the light sweetness imparted by just the right amount of confectioner's sugar is remarkable. I personally love the taste of hazelnuts and this reminded me of the delectable Ferrero Rocher, one of my favorite kind of chocolate. The sponge fingers lend the spongy texture of a cake, and the whipped cream gives the feel of an icecream. The chopped hazelnuts and morsels of chocolate were exceptional, making for a delicious bite among the light and fluffy whipped cream! My favorite part of this dessert was the hazelnut bits and the soaked sponge fingers.

I believe that this will taste just as delicious with almonds or cashews as well. Once the gateau is thawed in the fridge for about 10 minutes, the dessert will be ready to be sliced and served. I served the dessert with a simple decoration of cool whip swirls and a few cherry chocolate chips and hazelnuts. Try these out and I am sure you will love it. It makes for a really simple dessert with which you can impress your guests. Dust with a little cocoa and sugar and it will look stunning. Enjoy!!


Recipe (Serves 6-8) :

Hazelnuts - shelled, 3/4 cup
Sponge fingers - about 32
Cold strong black coffee - 2/3 cup
Brandy - 2 tbsp
Double (heavy) cream - 2 cups
Confectioner's (icing) sugar - 2/3 cup, sifted
Semi-sweet chocolate - 5 oz, chopped into small pieces
Icing sugar and Cocoa powder (for dusting)


Method:

Pre-heat the oven to 400F. Spread out the hazelnuts on a baking sheet and toast them in the oven for 5 minutes until golden.

Turn the nuts onto a clean dish towel and rub off the skins while still warm.

Cool, then chop finely.

Line a 5 cup loaf tin with cling wrap and cut the sponge fingers to fit the base and sides.

Reserve remaining fingers.

Mix the coffee with the brandy in a shallow dish.

Dip the sponge fingers briefly into the coffee mixture and return to tin, sugar side down, to fit.

Whip the cream with the icing sugar until it holds soft peaks.

Fold half of the chopped chocolate into the cream with the hazelnuts.

Use gentle figure-of -eight action to distribute the chocolate and nuts evenly.

Melt the remaining chocolate in a bowl set over a pan of barely simmering water. Cool, then fold into the cream mixture. Spoon into the tin.

Moisten the reamining fingers in the coffee mixture - take care not to soak the fingers, otherwise they will collapse.

Lay the moistened fingers over the filling.

Wrap and freeze until firm.

To serve, remove from the freezer 30 minutes before serving to allow the icecream to soften slightly.

Turn out onto a serving plate and dust with icing sugar and cocoa powder.

Source: Desserts 500 delicious recipes; Edited by Ann Kay.


Tips:

  1. I didnt use brandy with coffee. I used a bit of hot cocoa powder along with the coffee powder to make the dipping.
  2. I used about 4 oz of semi-sweet chocolate.
  3. I just had 24 sponge fingers (while the sponge fingers were in storage at my home, some in-home thieves stole the rest!), so I didnt top the dessert (when served, it lines the bottom) with moistened sponge fingers.
  4. The gateau was served decorated with whipped cream, whole hazelnuts and cherry chocolate chips.
  5. The dessert is very lightly sweetened. So if you are into sugar-high desserts, add more confectioner's sugar to the cream before whipping.


Have a great day!!

April 27, 2009

Vanilla Cheesecake with Graham-Pecan Crust

Its time for all us Daring Bakers to reveal our challenge for the month of April. Drum roll please....... The April 2009 challenge is hosted by Jenny from Jenny Bakes. She has chosen Abbey's Infamous Cheesecake as the challenge. We were required to bake a cheesecake and were allowed great freedom and creativity. The recipe given was for a basic vanilla cheesecake on a graham cracker crust.

This is my 11th Daring Baker Challenge. I decided to stick with the basics as this was my first cheesecake ever! So I made a Vanilla Cheesecake on a Graham-Pecan crust with home-made strawberry coulis. My creative juices were not flowing this month..... AT ALL.... Somehow I was deadly afraid of the challenge this time. I am still wondering why I was so scared of this challenge since the recipe seemed pretty much straight forward, and I have gone through with tougher challenges before! I guess the anticipation of my new work at the U and leaving my lil one at the school is getting to me even before I have started. I was procrastinating my challenge completion and finally mustered up enough courage to tackle it last Friday!!


I decided to make only 1/3 rd of the recipe so that I will have to make use of one 8oz block of cream cheese and adjusted all the other measurements accordingly. The crust was made as given in the recipe, but I added 1/4 cup of pecans to the food processor along with the graham crackers (1/3rd recipe) and crumbled it. The preparation of the cheesecake batter went without incidents. I baked the cake in a tart/quiche pan with fluted sides and removable bottom. I was planning to make some swirls on top with a different colored batter containing either chocolate or strawberry puree, but honestly in the end I just forgot!!


The cheesecake was baked in a water bath at 350F. In 20 minutes, when I checked the cheesecake seemed to be pretty much well-set without much jiggle in the middle. Maybe I should have checked it even before. Eventhough I thought I screwed everything up, it seemed pretty nice and well constructed. The gradual cooling helped and did not cause any cracks or craters on the surface and it turned out real nice and uniform.

After spending a day in the fridge, it was finally ready to be devoured on Saturday. JM was anticipating the tasting of the first home-made cheesecake and so was lil LM. She wanted the sprinkles more than anything!! When I took it off the pan for serving it seemed as if the crust was soggy. I thought that water had leaked in despite the double layer of foil and a layer of cling wrap!!


Usually when I stick to the original recipe without much creative changes, I try to bring some variety to the final presentation of the dish. This time my mind once again was totally blank. I couldnt come up with anything exciting. And those ideas that I had were too time-consuming and I honestly just didnt have enough energy to go through with it. So I finished the cheesecake with a simple topping of colored sprinkles and whole strawberries on the side. The individual servings were topped with a swirl of cool whip and a cherry with a chocolate garnish on the side and a bit of strawberry coulis. The second flower shaped cheesecake serving was a cut out from the original cheesecake, using a floral cookie cutter. I originally wanted to do a praline topping with chocolate drizzle.


VERDICT:

JM and I are not really cheesecake people, though we do enjoy it very rarely. But I must say that both of us enjoyed this cheesecake. I thought that the recipe was really simple and quick. The cheesecake was really smooth, beautiful to look at and delicious. I could proudly say that my first cheesecake experiment went without any major hurdles. My only complaint to myself was that since I reduced the recipe by 1/3rd, I couldnt get any traditional/typical pictures of the mile-high cheesecake slice!! :-) But the reduction in the recipe made the portions that we had, really enjoyable. Eventhough the crust appeared a bit dark and I thought that it was soggy, that was not the case. It was probably a bit moist (not soggy at all), because of the pecans? Anyways, I regret that I forgot to make swirls on the cheesecake and I couldnt make any exotic combinations this time. But I am happy that we fully enjoyed our first home-made cheesecake and I would suggest this recipe to my friends!!

Hope you all enjoyed reading through my experience and comments. Check out all my previous Daring Bakers Challenges here.


Abbey's Infamous Cheesecake:

Crust:

2 cups / 180 g graham cracker crumbs
1 stick / 4 oz butter, melted
2 tbsp. / 24 g sugar
1 tsp. vanilla extract

Cheesecake:

3 sticks of cream cheese, 8 oz each (total of 24 oz) room temperature
1 cup / 210 g sugar
3 large eggs
1 cup / 8 oz heavy cream
1 tbsp. lemon juice
1 tbsp. vanilla extract (or the innards of a vanilla bean)
1 tbsp liqueur, optional, but choose what will work well with your cheesecake


DIRECTIONS:


1. Preheat oven to 350 degrees F (Gas Mark 4 = 180C = Moderate heat). Begin to boil a large pot of water for the water bath.

2. Mix together the crust ingredients and press into your preferred pan. You can press the crust just into the bottom, or up the sides of the pan too - baker's choice. Set crust aside.

3. Combine cream cheese and sugar in the bowl of a stand-mixer (or in a large bowl if using a hand-mixer) and cream together until smooth. Add eggs, one at a time, fully incorporating each before adding the next. Make sure to scrape down the bowl in between each egg. Add heavy cream, vanilla, lemon juice, and alcohol and blend until smooth and creamy.

4. Pour batter into prepared crust and tap the pan on the counter a few times to bring all air bubbles to the surface. Place pan into a larger pan and pour boiling water into the larger pan until halfway up the side of the cheesecake pan. If cheesecake pan is not airtight, cover bottom securely with foil before adding water.

5. Bake 45 to 55 minutes, until it is almost done - this can be hard to judge, but you're looking for the cake to hold together, but still have a lot of jiggle to it in the center. You don't want it to be completely firm at this stage. Close the oven door, turn the heat off, and let rest in the cooling oven for one hour. This lets the cake finish cooking and cool down gently enough so that it won't crack on the top. After one hour, remove cheesecake from oven and lift carefully out of water bath. Let it finish cooling on the counter, and then cover and put in the fridge to chill. Once fully chilled, it is ready to serve.

Pan note:

The creator of this recipe used to use a springform pan, but no matter how well she wrapped the thing in tin foil, water would always seep in and make the crust soggy. Now she uses one of those 1-use foil "casserole" shaped pans from the grocery store. They're 8 or 9 inches wide and really deep, and best of all, water-tight. When it comes time to serve, just cut the foil away.

Prep notes:


While the actual making of this cheesecake is a minimal time commitment, it does need to bake for almost an hour, cool in the oven for an hour, and chill overnight before it is served. Please plan accordingly!


Some variations from the recipe creator:

** Lavender-scented cheesecake w/ blueberries - heat the cup of heavy cream in the microwave or a saucepan until hot but not boiling. Add 2 tbsp of lavender flowers and stir. Let lavender steep in the cream for about 10-15 minutes, then strain the flowers out. Add strained cream to cheesecake batter as normal. Top with fresh blueberries, or make a quick stovetop blueberry sauce (splash of orange juice, blueberries, a little bit of sugar, and a dash of cinnamon - cook until berries burst, then cool).

** Cafe au lait cheesecake with caramel - take 1/4 cup of the heavy cream and heat it in the microwave for a short amount of time until very hot. Add 1-2 tbsp. instant espresso or instant coffee; stir to dissolve. Add this to the remainder of cream and use as normal. Top cheesecake with homemade caramel sauce (I usually find one on the food network website - just make sure it has heavy cream in it. You can use store-bought in a pinch, but the flavor is just not the same since its usually just sugar and corn syrup with no dairy).

** Tropical – add about a half cup of chopped macadamias to the crust, then top the cake with a mango-raspberry-mandarin orange puree.

** Mexican Turtle - add a bar of melted dark chocolate (between 3 and 5 oz., to taste) to the batter, along with a teaspoon of cinnamon and a dash of cayenne pepper (about 1/8 tsp.). Top it with pecan halves and a homemade caramel sauce.

** Honey-cinnamon with port-pomegranate poached pears – replace 1/2 cup of the sugar with 1/2 cup of honey, add about a teaspoon or more (to taste) of cinnamon. Take 2 pears (any variety you like or whatever is in season), peeled and cored, and poach them in a boiling poaching liquid of port wine, pomegranate juice/seeds, a couple of "coins" of fresh ginger, a cinnamon stick, and about a 1/4 cup of sugar. Poach them until tender, then let cool. Strain the poaching liquid and simmer until reduced to a syrupy-glaze consistency, then cool. Thinly slice the cooled pears and fan them out atop the cooled cheesecake. Pour the cooled poaching syrup over the pears, then sprinkle the top with chopped walnuts and fresh pomegranate seeds.

Some variations from Jenny (from JennyBakes):

**Key lime - add zest from one lime to sugar before mixing with cream cheese. Substitute lemon juice, alcohol, and vanilla with key lime juice.
**Cheesecakelets - put in muffin tins, ramekins, or custard cups. Try baking 20-35 minutes, or until still a little jiggly, and cool as before.


Dont forget to check out the wide array of flavor combinations in the DB cheesecake factory this month!

Come back soon for more recipes from Tasty treats! Have a great day!!