Showing posts with label canadian. Show all posts

April 27, 2011

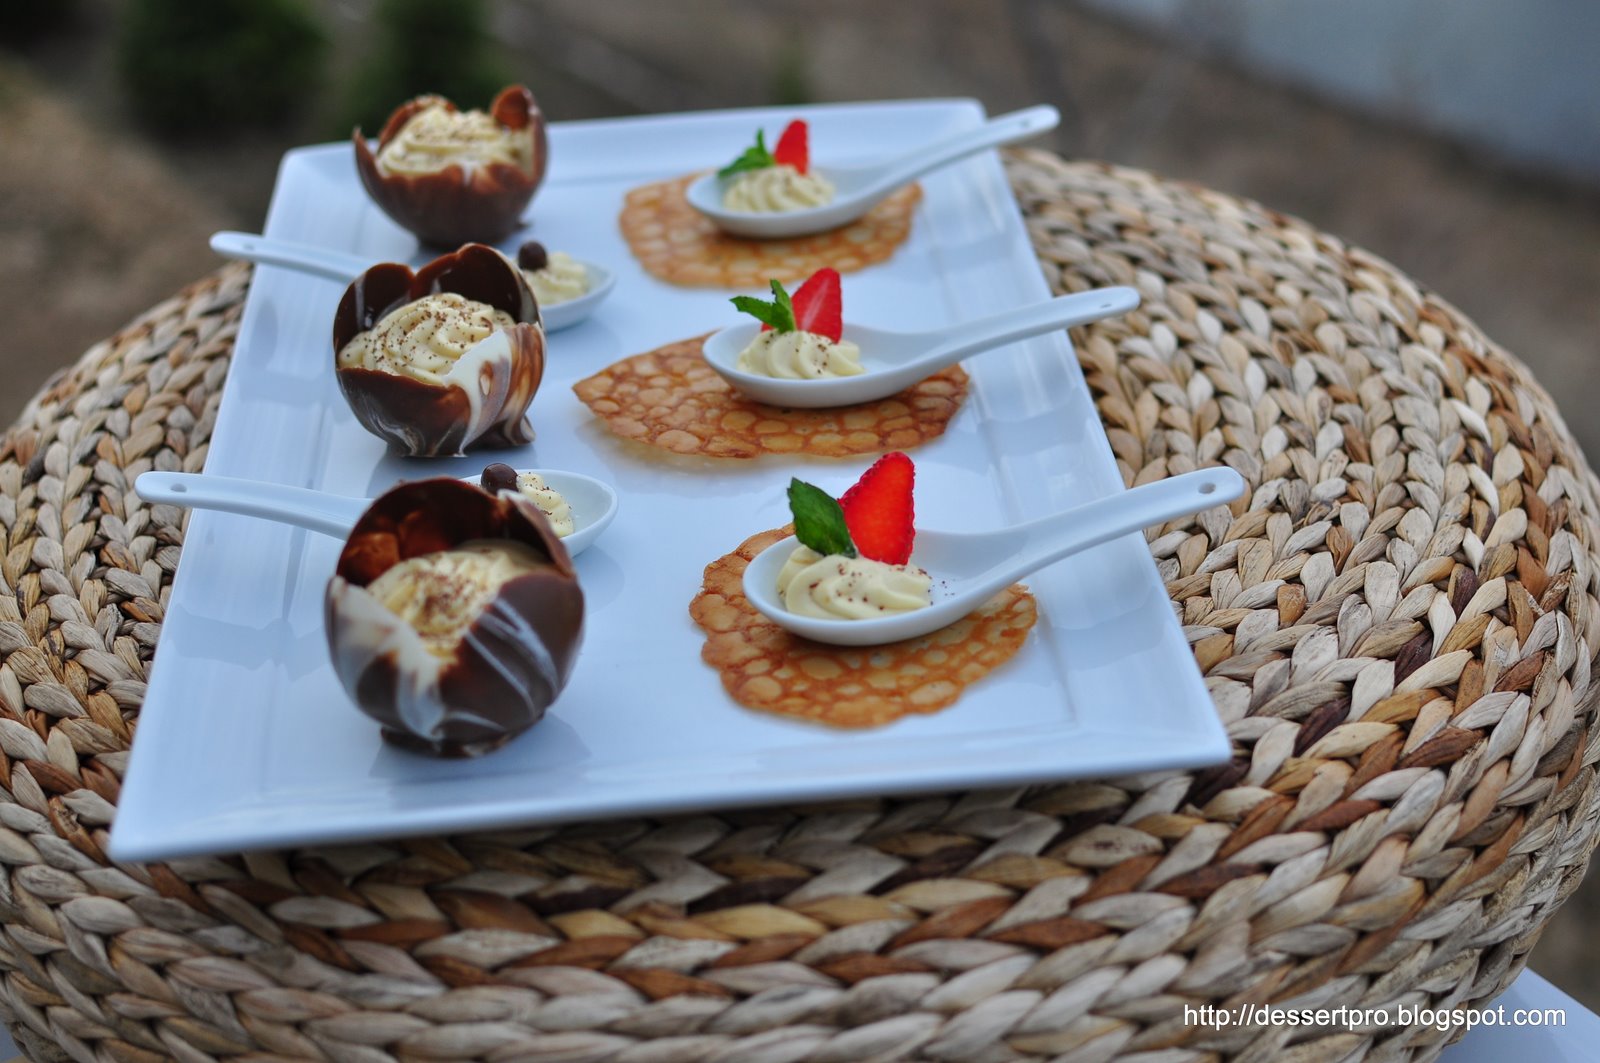
Maple mousse in edible cups for Daring Bakers


The April 2011 Daring Bakers’ challenge was hosted by Evelyne of the blog Cheap Ethnic Eatz. Evelyne chose to challenge everyone to make a maple mousse in an edible container. Prizes are being awarded to the most creative edible container and filling, so vote on your favorite from April 27th to May 27th at http://thedaringkitchen.com/!


Oh yeah!!! I was soo excited to see that there was an award offered this month for the most creative edible container! But it turned to be one of my most uncreative months! Yeah, I did make some fun containers that I have never tried before, but I did not "wow" myself! We did get some very pretty pictures of the mousse and the edible containers, though!! I am very happy with this set of natural light photography! :-)


Now that the time for the challenge is over, I am getting new ideas (ofcourse!!). I think maple mousse truffles covered in tempered chocolate would have been nice! Maybe even a maple mousse cake pop covered in a myriad of colors... A chocolate cage, or a sugar cup.. Oh my! I should've done some of those..... But the best part of this challenge is that I have a new found love towards chocolate art! I am fearless of tempering chocolate and I have great interest in learning about chocolate art now!! The mousse was amazing, it showed me how better pure maple syrup is, how maple flavored syrup cannot capture even remotely the goodness of pure syrup! It was pure heaven in a chocolate cup. The recipe yielded enough mousse to cover dessert for more than a few days!! I am happy with the outcomes of the challenge. The challenge was YUMMMMMMYYY!!! :-)


Bacon Cups:


Ingredients:
24 thin slices good quality bacon
Directions:
1. Pre-heat the oven to 400 degrees F/200 degrees C.
2. Take a muffin pan or 6 small ½ cup capacity heat-proof bowls, turn upside down and carefully form aluminum foil covers on the back of 6 muffin cups or the bowls.
3. Taking 2 strips of bacon at a time crisscross the strips over the backs of the muffin cups and cut to size a tad longer then the bottom part of the cup. Now use 1 to 2 more strips to cover the sides of the muffin cups in a weaving fashion. You want a full tight weave because bacon shrinks a lot. For smaller cups I used a shot glass with a square of bacon for the bottom and I wrapped 1 strip around the side.
4. Tuck the ends of the bacon strips inside otherwise they will curl while cooking. A good idea is to insert 4 toothpicks where the crisscrossed bacon meets in the weave.
5. Place muffin pan in a cookie tray to catch drippings. Bake in oven for about 25 to 40 minutes, or until the bacon is golden and crisp but not burned.
6. Cool completely, a good hour, before removing your cups delicately from the foil.


Nut Bowls:


Ingredients:
 1 1/2 cups crushed nuts of your choice such as almonds, hazelnuts or walnuts
 1 egg, beaten, at room temperature
 2 tablespoon sugar
 1/2 cup dark chocolate pieces
Directions:
1. Use a food processor or a zip-lock back with a rolling pin to crush your nuts if whole, use about 1 cup of whole nuts to get 3/4 cups crushed. You want it somewhat coarse.
2. In a bowl mix the nuts with the beaten egg and the sugar.
3. Take 6 small ½ cup capacity Pyrex cups or a similar container and line the inside with aluminum foil. Spread ¼ cup of the mixture in the bowl, all the way up to the sides making sure you have a thin and even clean layer all around.
4. Bake at 350 degrees F/175 degrees C. until the nuts are golden and fragrant (about 15 minutes). Let cool completely before unmoulding.
5. Melt chocolate (either in the microwave or over a double boiler). Dip the rims of the cooled nut bowls in the chocolate. Place in the freezer for at least 15 minutes or until the chocolate has hardened and is set.


Maple Mousse:
Ingredients:
 1 cup (240 ml/ 8 fluid oz.) pure maple syrup (not maple-flavoured syrup)
 4 large egg yolks
 1 package (7g/1 tbsp.) unflavoured gelatine
 1 1/2 cups (360 ml. g/12 fluid oz) whipping cream (35% fat content)
Directions:
1. Bring maple syrup to a boil then remove from heat.
2. In a large bowl, whisk egg yolks and pour a little bit of the maple syrup in while whisking (this is to temper your egg yolks so they don’t curdle).
3. Add warmed egg yolks to hot maple syrup until well mixed.
4. Measure 1/4 cup of whipping cream in a bowl and sprinkle it with the gelatine. Let it rest for 5 minutes. Place the bowl in a microwave for 45 seconds (microwave for 10 seconds at a time and check it in between) or place the bowl in a pan of barely simmering water, stir to ensure the gelatine has completely dissolved.
5. Whisk the gelatine/whipping cream mixture into the maple syrup mixture and set aside.
6. Whisk occasionally for approximately an hour or until the mixture has the consistency of an unbeaten raw egg white.
7. Whip the remaining cream. Stir 1/4 of the whipped cream into the maple syrup mixture. Fold in the remaining cream and refrigerate for at least an hour.
8. Remove from the fridge and divide equally among your edible containers.


Vegan Maple Mousse:
Ingredients:
 1 package (12 oz.) soft silken tofu
 ¾ cup (14 fluid oz.) pure maple syrup
 2 teaspoon agar-agar
Directions:
1. Let tofu come to room temperature. Using a food processor, blender, or hand mixer, blend tofu until just smooth.
2. Sprinkle agar-agar on the maple syrup and let it rest for 10 minutes. Heat maple syrup on the stove to a boil and then let it simmer 5 minutes until the agar-agar has dissolved.
3. In a food processor, blender, or a large bowl, blend the tofu with the maple syrup until creamy.
4. Refrigerate for at least one hour. Remove from the fridge and divide among your edible containers.


Meringue (optional):
Ingredients:
 3 large egg whites at room temperature
 ¾ cup (165 g./5.5 oz) sugar
Directions:
1. Preheat the oven to 300 degrees F/150 degrees C.
2. Put the egg whites in a large bowl. Using an electric mixer beat for a few minutes until the whites become stiff. Now add the sugar, a little at a time, whisking until the mixture is stiff and glossy. You should be able to turn the bowl upside down and the mixture won’t fall out.
3. Place baking parchment on to a clean baking sheet. Using a spoon or a piping bag, dollop the meringue into circles that fit inside the rim of your edible cups. (See mine, I wanted height but they fell a bit...which is OK...freeform art)
4. Put the tray in the oven, then immediately turn the oven down to 250 degrees F/130 degrees C. and bake for 45 minutes.
5. Turn off the oven and allow the meringues to cool in the oven for a few hours.
6. Place meringues as decoration on your maple mousse which has already be spooned into your edible containers.


Chocolate Tulip cups:


Blow some balloons to the size of an orange or bigger, depending on the size of the desired tulips cups. Melt chocolate in 15s increments in the microwave until melted and smooth. Let the chocolate get to slightly warm temperature. Dip the balloon slightly slanted and overlapping so as to make the petals of the tulips. Hold the balloons vertically on a parchment lined sheet pan for a few seconds and let harden. Gently snip the upper tip of the balloon with scissors and let the air escape slowly. Remove the balloons and fill the chocolate containers with your desired filling and enjoy!


I used light chocolate candy melts (Michaels) and white chocolate chips (Hershey's) swirled together for my tulip cups.


Chocolate cups using cupcake liners:


Melt chocolate at 15s increments in the microwave until melted and smooth and at about 40C. Temper the chocolate using the microwave method (just google!!). Brush a layer of melted tempered chocolate onto the bottom and sides of a cupcake liner placed in a muffin pan. Tempered chocolate will dry quickly and will have a snap to it when broken. Enjoy with your favorite filling!


Sugar Brandy Snaps:


Check out this link for the recipe I used to make sugar brandy snaps. I didn't use brandy or ginger though! :-) I just kept them as flat snaps and I thought they looked stunning!! Follow steps 1-3 for sugar snaps!


The texture and taste of real tempered chocolate is much much better than candy melts. They seemed a bit chewy for my taste whereas the chocolate cups that I made with tempered semisweet chocolate were amazing!! Chocolate and maple mousse go very well together! YUMM!


Candy melts are convenient in that we do not need to go into the trouble of tempering them. They also set pretty quick. They are good in that we can make cut outs and/or mold them a bit easier (I felt) than real chocolate.


My chocolate tulip cups and chocolate cups were satisfying!! Maple mousse was just out of the world! It would have been fine if it was a little less sweet.


Thanks for visiting!! Enjoy your week! Couldn't stop myself from posting all these pictures.. Hope you enjoyed going through the pictures as much as I did presenting them!


January 27, 2010

Graham Crackers and Nanaimo Bars for Daring Bakers Challenge!

After missing the Daring Baker's Challenge in December, I'm back in the new year with White Chocolate Nanaimo Bars!! The January 2010 Daring Bakers’ challenge was hosted by Lauren of Celiac Teen. Lauren chose Gluten-Free Graham Wafers and Nanaimo Bars as the challenge for the month. The sources she based her recipe on are 101 Cookbooks and http://www.nanaimo.ca/.

I wanted to be creative this month and try some amazing combinations of flavors but again, I didn't get enough time to put my ideas into action. Lauren encouraged us to try gluten-free graham crackers, but unfortunately in the end I had to go with what I had at home. I used a mix (half each) of wheat flour and all-purpose flour for my graham crackers. I halved the recipe for the crackers as it was advised in the forum that we just need 1/4 recipe for making the nanaimo bars given for the challenge. The dough indeed was very soft and was kind of loose, so I added probably 1/4 cup more flour to make it into a dough.

The dough was not super bad to work with but I should say it was very soft and delicate. Since I knew I am going to use the crackers for the bars, I didnt bother to cut them out of rolled dough. I just cut the rolled dough and baked as is. My crackers didn't need to be baked for even 20 minutes because I opened the oven around 20 minutes and the edges had actually started to burn! (Lesson: Keep an eye on the crackers!!). So there's no picture of the baked crackers! ;-)


I made the rest of the nanaimo bars according to the recipe given. Eventhough initially it felt like there wasnt enough of the custard middle layer to cover the bottom layer, it gradually gives away and spreads nicely. After reading a comment about how the chocolate top layer wasn't enough to cover the top, I doubled the amount of chocolate (white) but used the amount of butter specified in the recipe. There was more than enough to spread on top. A bit of butterscotch chocolate garnish on top finished off my nanaimo bars!!

VERDICT: Nanaimo bars sure are delicious!! The combination of all three layers work perfectly. My favourite is the bottom layer which is a mixture of all different textures. The soft cracker crumbs along with chewy shredded coconut and crunchy (yes, they stay crunchy!!) almonds are awesome! I could eat them all the time :-). I think I should not have used any more chocolate for the top layer than what was given in the recipe because taken together, the three layers would work the best (perfect sweetness) at the proportions given.

I have made Nanaimo bars before, and both times I found it too sweet for my tastes, though that doesn't mean that I wouldn't eat them!! JM loved the nanaimo bars too, lil LM was happy licking the butterscotch chips! ;-)


Preparation time:

• Graham Wafers: 30 to 45 minutes total active prep, 2 ½ hours to overnight and 45 minutes inactive prep.
• Nanaimo Bars: 30 minutes.

Equipment required:
• Food Processor
• Bowls
• Parchment paper or silpats
• Cookie sheets
• Double boiler or pot and heatproof bowl
• 8 by 8 inch square pan
• Hand mixer or stand mixer (You may use a wooden spoon, but this makes it much easier!)
• Saucepan

Gluten-Free Graham Wafers

Ingredients
1 cup (138 g) (4.9 ounces) Sweet rice flour (also known as glutinous rice flour)
3/4 cup (100 g) (3.5 ounces) Tapioca Starch/Flour
1/2 cup (65 g) (2.3 ounces) Sorghum Flour
1 cup (200 g) (7.1 ounces) Dark Brown Sugar, Lightly packed
1 teaspoon (5 mL) Baking soda
3/4 teaspoon (4 mL ) Kosher Salt
7 tablespoons (100 g) (3 ½ ounces) Unsalted Butter (Cut into 1-inch cubes and frozen)
1/3 cup (80 mL) Honey, Mild-flavoured such as clover.
5 tablespoons (75 mL) Whole Milk
2 tablespoons (30 mL) Pure Vanilla Extract


Directions:

1. In the bowl of a food processor fitted with a steel blade, combine the flours, brown sugar, baking soda, and salt. Pulse on low to incorporate. Add the butter and pulse on and off, until the mixture is the consistency of a coarse meal. If making by hand, combine aforementioned dry ingredients with a whisk, then cut in butter until you have a coarse meal. No chunks of butter should be visible.

2. In a small bowl or liquid measuring cup, whisk together the honey, milk and vanilla. Add to the flour mixture until the dough barely comes together. It will be very soft and sticky.

3. Turn the dough onto a surface well-floured with sweet rice flour and pat the dough into a rectangle about 1 inch thick. Wrap in plastic and chill until firm, about 2 hours, or overnight.

4. Divide the dough in half and return one half to the refrigerator. Sift an even layer of sweet rice flour onto the work surface and roll the dough into a long rectangle, about 1/8 inch thick. The dough will be quite sticky, so flour as necessary. Cut into 4 by 4 inch squares. Gather the scraps together and set aside. Place wafers on one or two parchment-lined baking sheets. Chill until firm, about 30 to 45 minutes. Repeat with the second batch of dough.

5. Adjust the rack to the upper and lower positions and preheat oven to 350 degrees Fahrenheit (180 degrees Celsius).

6. Gather the scraps together into a ball, chill until firm, and reroll. Dust the surface with more sweet rice flour and roll out the dough to get a couple more wafers.

7. Prick the wafers with toothpick or fork, not all the way through, in two or more rows.

8. Bake for 25 minutes, until browned and slightly firm to the touch, rotating sheets halfway through to ensure even baking. Might take less, and the starting location of each sheet may determine its required time. The ones that started on the bottom browned faster.

9. When cooled completely, place enough wafers in food processor to make 1 ¼ cups (300 mL) of crumbs. Another way to do this is to place in a large ziplock bag, force all air out and smash with a rolling pin until wafers are crumbs.


Nanaimo Bars

Ingredients:

For Nanaimo Bars — Bottom Layer
1/2 cup (115 g) (4 ounces) Unsalted Butter
1/4 cup (50 g) (1.8 ounces) Granulated Sugar
5 tablespoons (75 mL) Unsweetened Cocoa
1 Large Egg, Beaten
1 1/4 cups (300 mL) (160 g) (5.6 ounces) Gluten Free Graham Wafer Crumbs (See previous recipe)
1/2 cup (55 g) (1.9 ounces) Almonds (Any type, Finely chopped)
1 cup (130 g) (4.5 ounces) Coconut (Shredded, sweetened or unsweetened)

For Nanaimo Bars — Middle Layer
1/2 cup (115 g) (4 ounces) Unsalted Butter
2 tablespoons and 2 teaspoons (40 mL) Heavy Cream
2 tablespoons (30 mL) Vanilla Custard Powder (Such as Bird’s. Vanilla pudding mix may be substituted.)
2 cups (254 g) (8.9 ounces) Icing Sugar

For Nanaimo Bars — Top Layer
4 ounces (115 g) Semi-sweet chocolate
2 tablespoons (28 g) (1 ounce) Unsalted Butter


Directions:

1. For bottom Layer: Melt unsalted butter, sugar and cocoa in top of a double boiler. Add egg and stir to cook and thicken. Remove from heat. Stir in crumbs, nuts and coconut. Press firmly into an ungreased 8 by 8 inch pan.

2. For Middle Layer: Cream butter, cream, custard powder, and icing sugar together well. Beat until light in colour. Spread over bottom layer.

3. For Top Layer: Melt chocolate and unsalted butter over low heat. Cool. Once cool, pour over middle layer and chill.

-------------------------------
Additional Information:

These bars freeze very well, so don’t be afraid to pop some into the freezer.

The graham wafers may be kept in an airtight container for up to 2 weeks. Mine lasted about that long.

If making the graham crackers with wheat, replace the gluten-free flours (tapioca starch, sweet rice flour, and sorghum flour) with 2 ½ cups plus 2 tbsp of all-purpose wheat flour, or wheat pastry flour. Watch the wheat-based graham wafers very closely in the oven, as they bake faster than the gluten-free ones, sometimes only 12 minutes.

For the Nanaimo Bars, if making with wheat, replace the gluten-free graham wafer crumbs with equal parts wheat graham wafer crumbs!


Have a great day everyone!!! Hoping to see you soon here on Tasty treats!


June 24, 2008

Cappuccino Nanaimo Bars


The Nanaimo bar is a dessert of Canadian origin popular across North America. A type of chocolate no-bake square, it receives its name from the city of Nanaimo, British Columbia. It consists of a crumb-based layer, topped by a layer of light custard or vanilla butter icing, which is covered in chocolate (wiki). I enjoyed taking part in Sugar High Friday May 2008 event, so I was looking forward to participate in June's event too. This month the theme is "Mmm...Canada" calling everyone to make something (either sweet or savory) Canadian! The sweet version is hosted by Jennifer of The Domestic Goddess. Coincidentally, the theme for AFAM is Coconut. Since this recipe has coconut in it, it would fit AFAM too. It was a bit of work making them, but it sure was well worth the effort! I only made half the recipe, and almost everything worked out perfect. The taste was exceptional!! I took them to a gathering of a few friends and they all loved it! I expected them to be put off by the sweetness, but they mentioned in unison that they didnt mind because the bars were awesome! This is a calorie-laden sweet but excellent to take to a gathering or to a party. So make sure you have some friends to share the guilt and the calories! ;-) I am posting the halved recipe here. Check out this link for the original recipe. I hope you all enjoy these yummy bars! To all the chocoholics ( I am one of them!) out there, this is for you!!

Recipe (Makes 8 bars) :

Base:

Chocolate cookie crumbs - 3/4 cup
Unsalted butter - 1/4 cup
Cocoa powder - 2 1/2 tbsp
Sugar - 1/8 cup
Egg - 1/2
Vanilla extract - 1/2 tsp
Unsweetened grated coconut - 1/2 cup
Walnuts - 1/4 cup, toasted and chopped

Filling:

Icing sugar - 1 1/2 cups, sifted
Unsalted butter - 1/6 cup, at room temperature
Custard powder - 3/4 tbsp
Milk - 1/8 cup
Instant coffee powder - 1 tsp
Vanilla - 1 tsp

Topping:

Semisweet chocolate - 4 oz
Unsalted butter - 1 tbsp


Method:

Preheat the oven to 350F.

Grease bottom and sides of 8-inch square pan (I spread the mixture on half the pan) with vegetable oil or spray.

For base, melt butter and stir in sugar.

Sift cocoa powder into mixture and blend well.

Whisk together egg and vanilla extract and add.

Blend in chocolate cookie crumbs, coconut and chopped walnuts until evenly incorporated.

Press into prepared pan and bake for 10 minutes.

Allow to cool for 10 minutes then chill for 20 minutes.

For cappuccino filling, beat butter by hand until smooth and beat in custard powder.

Heat milk with coffee powder to dissolve and cool to room temperature.

Add milk to butter mixture a stir in sifted icing sugar a cup at a time, combining well.

Spread over base and chill while preparing topping.

For topping, melt chocolate and butter over a pot of gently simmering water.

Pour over vanilla filling and spread to cover evenly.

Chill for 30 minutes.

To serve, slice with a hot, dry knife into 1-inch squares.


Tips:

  1. I used oreos for the crumb base.
  2. Reduce or omit the sugar if using oreos for the base (or if using sweetened coconut), because it already has the creme-filling.
  3. I used chopped mixed nuts instead of toasted wlanuts and flaked coconut from the store (it was actually a bit sweet).
  4. I would recommend reducing the amount of sugar for the filling to 3/4 - 1 cup. I added about 1 1/4 cup and still it was very sweet.
  5. For instant coffee powder for the filling I used Nescafe instant coffee granules.
  6. For custard powder, I used the Jello vanilla pudding powder (not the instant one).
  7. For the topping I melted the chocolate and butter in the microwave.
  8. The preparation method mentions chilling the filling until the chocolate topping is made. I would recommend keeping it in the freezer until you make the topping because, when I poured the topping over the custard filling, it hadnt set properly, so I didnt get three distinct layers. So I just worked with what I had and made swirls of chocolate on the vanilla layer. This didnt compromise the taste at all.


I am sending these bars to "SHF - Mmm Canada" hosted by Jennifer of The Domestic Goddess and to "AFAM - Coconut" hosted by Suganya of Tasty Palettes. Enjoy!! :-)

Dont forget to check out the new pictures over at "Through the looking glass".