Showing posts with label daring bakers. Show all posts

July 27, 2011

Strawberry Fraisiers for DB Challenge!


Jana of Cherry Tea Cakes was our July Daring Bakers’ host and she challenges us to make Fresh Frasiers inspired by recipes written by Elisabeth M. Prueitt and Chad Robertson in the beautiful cookbook Tartine.
I am back to blogging just in time for this month's DB challenge, after a seemingly long break of a couple of months. I was just caught up in life's busy schedule. A lot has happened in the last few months. My parents are visiting us from India for 3 months and my lil girl is enjoying the attention and love of her grandparents whom she has not seen for a couple of years. I had to change my job, life has been busy with the new job and new responsibilities! Change is hard, I got through it and am much more comfortable now at my new place... I sure missed blogging but you all know how it is...
Another awesome news is that I got to go to the U2 concert in Minneapolis - was a night of fun and awesome music! I had so much fun!! Thanks to my dear husband for gifting us with the great seats and a great experience! Loooooooved it!


Now, coming back to the challenge, let me start by saying that this was one of the most fun challenges ever! Thanks, Jana! It was enjoyable every step of the way, with simple ingredients and techniques, but still with an oppurtunity for creativity and skills... Eventhough, I thought that I had made mistakes with the pastry cream and the cake, in the end it turned out beautiful, silky smooth, cool and refreshing. The entire cake was just amazing, not so sweet, not heavy and overwhelming, but really soothing, cool and really summer-y!! I am really happy with the outcome of my challenge, and would recommend this to everyone- it makes a great summer cake!

My cake did sink out of the oven, but it was still soft and airy, so I just leveled off the top and used as directed. My pastry cream did thicken a bit more than I would have liked, so I added more milk to thin it out. So I used gelatin accordingly to account for the extra cream. Like others mentioned, I think the hardest part was covering the springform ring with clingwrap! The wait after assembly was another agonizing step without knowing whether the cake assembly was perfect and whether the cream would hold up.

Needless to say, everything went well, and the cake held up beautifully. Even the slice was beautiful and held up without getting squished. In short, my family enjoyed it immensely and so did my friend. I also saved a slice for my coworker (Allison, thats you!) who enjoyed every bit of it, I was thrilled with her reaction! Anyways, its great to be back with a great challenge completed successfully..

Basic Chiffon Cake:
for gluten free and vegan options see the links at the end

Ingredients:
1 cup + 2 tablespoons (270 ml) (5½ oz/155 gm) all-purpose flour
1 teaspoon (5 ml) (4 gm) baking powder
3/4 cups (180 ml) (6 oz /170 gm) sugar
1/2 teaspoon (2½ ml) (1½ gm) salt, preferably kosher
1/4 cup (2 fl oz/60 ml) vegetable oil
3 large egg yolks
⅓ cup + 1 tablespoon (3.17 fl oz/95 ml) water
1 teaspoon (5 ml) pure vanilla extract
3/4 teaspoon (3¾ ml) (3 gm) lemon zest, grated
5 large egg whites
¼ teaspoon (1¼ ml) (1 gm) cream of tartar
Directions:

1. Preheat the oven to moderate 325°F (160°C/gas mark 3).

2. Line the bottom of an 8-inch (20 cm) spring form pan with parchment paper. Do not grease the sides of the pan.

3. In a large mixing bowl, stir together the flour and baking powder. Add in all but 3 tablespoons (45 ml.) of sugar, and all of the salt. Stir to combine.

4. In a small bowl combine the oil, egg yolks, water, vanilla and lemon zest. Whisk thoroughly.

5. Combine with the dry ingredients and mix thoroughly for about one minute, or until very smooth.

6. Put the egg whites into a stand mixer, and beat on medium speed using a whisk attachment on a medium speed, until frothy. Add cream of tartar and beat on a medium speed until the whites hold soft peaks. Slowly add the remaining sugar and beat on a medium-high speed until the whites hold firm and form shiny peaks.

7. Using a grease free rubber spatula, scoop about ⅓ of the whites into the yolk mixture and fold in gently. Gently fold in the remaining whites just until combined.

8. Pour the batter into the prepared pan. Bake for 45 to 55 minutes or until toothpick inserted into the center comes out clean.

9. Removed the cake from the oven and allow to cool in the pan on a wire rack.

10. To unmold, run a knife around the sides to loosen the cake from the pan and remove the spring form sides. Invert the cake and peel off the parchment paper. Refrigerate for up to four days.

Variations to the Basic Chiffon Cake:
Lemon Chiffon Cake
Ingredient Alterations:

Reduce water to 1/4 cup (60 ml)
Add 1/8 cup (30 ml) lemon juice
Increase lemon zest to 1½ teaspoon (7½ ml) (5 gm)
Remove the vanilla from the recipe

Direction Alterations:
Follow the directions, same as above, adding the lemon juice and zest to the oil, egg yolks and water in step 4.

Orange Chiffon Cake

Ingredient Alterations:

Replace the full amount of water with orange juice
Replace lemon zest with the zest of one orange
Remove the vanilla from the recipe

Direction Alterations:
Follow the directions, same as above, adding the orange juice and zest to the oil, and egg yolks in step 4.


Coconut Chiffon Cake
Ingredient Alterations:
Add ¼ teaspoon (1¼ ml) (1 gm) freshly ground nutmeg
Reduce oil to 1/8 cup (1 fl oz/30ml)
Reduce water to 1/8 cup (1 fl oz/30ml)
Add 1/3 cup (2 ⅔ fl oz/80 ml) unsweetened coconut milk
Remove the vanilla from the recipe

Direction Alterations:
Follow the directions, same as above, adding the nutmeg to the flour mixture in step 3, and the coconut
milk to the oil, water and egg yolks in step 4.

Chocolate Chiffon Cake
Ingredient Alterations:
Reduce all-purpose flour to ¾ cup + 1 tablespoon (195 ml) (4 oz/110 g)
Add 1/4 cup (60 ml) (3/4 oz/20 g) cocoa powder
Direction Alterations:
Follow the directions, same as above, adding the cocoa to the flour mixture in step 3.


Pastry Cream Filling:
Gluten Free! Vegans see the links at the end!

Ingredients:
1 cup (8 fl oz/250 ml) whole milk
1/2 teaspoon (2½ ml) pure vanilla extract
1/8 teaspoon (1/2 ml) (¼ gm) salt, preferably kosher
2 tablespoons (30 ml) (10 gm)cornstarch
1/4 cup (60 ml) (2 oz/55 gm) sugar
1 large egg
2 tablespoons (30 ml) (1 oz/30 gm) unsalted butter
3/4 teaspoon (3¾ ml) (4 gm) gelatin
1/2 tablespoon (7½ ml) water
1 cup (8 fl oz/250 ml) heavy cream

Directions:
1. Pour the milk, vanilla, and salt into a heavy sauce pan. Place over medium-high heat and scald, bringing it to a near boiling point. Stir occasionally.

2. Meanwhile, in a stand mixer add the cornstarch and sugar. Whisk to combine.

3. Add the eggs to the sugar and cornstarch and whisk until smooth.

4. When the milk is ready, gently and slowly while the stand mixer is whisking, pour the heated milk down the side of the bowl into the egg mixture.

5. Pour the mixture back into the warm pot and continue to cook over a medium heat until the custard is thick, just about to boil and coats the back of a spoon.

6. Remove from heat and pass through a fine mesh sieve into a large mixing bowl. Allow to cool for ten minutes stirring occasionally.

7. Cut the butter into four pieces and whisk into the pastry cream a piece at a time until smooth.

8. Cover the cream with plastic wrap, pressing the plastic wrap onto the top of the cream to prevent a skin from forming. Chill in the refrigerator for up to five days.

9. In a small dish, sprinkle the gelatin over the water and let stand for a few minutes to soften.

10. Put two inches (55 mm) of water into a small sauce pan and bring to a simmer over a medium heat.

11. Measure 1/4 cup (2 oz/60 ml) of the chilled pastry cream into a small stainless steel bowl that will sit across the sauce pan with the simmering water, without touching the water.

12. Heat the cream until it is 120 F (48.8 C). Add the gelatin and whisk until smooth. Remove from the water bath, and whisk the remaining cold pastry cream in to incorporate in two batches.

13. In a stand mixer, fitted with the whisk attachment, whip the cream until it holds medium-stiff peaks. Immediately fold the whipped cream into the pastry cream with a rubber spatula.


Simple Syrup:
gluten free and vegan!

You may choose to flavor the syrup. One way is to use flavored sugar (for example:
apple cider sugar, orange sugar, or vanilla sugar) or to stir in 1-2 teaspoons of
flavored extract. You may also infuse with herbs or spices, if desired or add four
tablespoons (60 ml) of fruit juice or liqueur while the syrup is cooling.
Ingredients:
1/3 cup (2⅔ fl oz/80 ml) (2⅔ oz/75 gm) of sugar, flavored or white
1/3 cup (2⅔ fl oz/80 ml) of water

Directions:
1. Combine the water and sugar in a medium saucepan.

2. Bring the mixture to a boil and let the sugar dissolve. Stirring is not
necessary, but will not harm the syrup.

3. Remove the syrup from the heat and cool slightly.

4. Transfer syrup to a lidded container or jar that can be stored in the refrigerator. Simple syrup can be stored for up to one month.


Fraisier Assembly:

Components:
1 baked 8 inch (20 cm) chiffon cake
1 recipe pastry cream filling
⅓ cup (80 ml) simple syrup or flavored syrup
2 lbs (900 g) strawberries
confectioners’ sugar for dusting
½ cup (120 ml) (5 oz/140 gm) almond paste

Directions:

1. Line the sides of a 10-inch (25 cm) spring form pan with plastic wrap. Do not line the bottom of the pan.
2. Cut the cake in half horizontally to form two layers.
3. Fit the bottom layer into the prepared spring form pan. Moisten the layer evenly with the simple syrup. When the cake has absorbed enough syrup to resemble a squishy sponge, you have enough.
4. Hull and slice in half enough strawberries to arrange around the sides of the cake pan. Place the cut side of the strawberry against the sides of the pan, point side up forming a ring.
5. Pipe cream in-between strawberries and a thin layer across the top of the cake.
6. Hull and quarter your remaining strawberries and place them in the middle of the cake. Cover the strawberries and entirely with the all but 1 tbsp. (15 ml) of the pastry cream.
7. Place the second cake layer on top and moisten with the simple syrup.
8. Lightly dust a work surface with confectioners' sugar and roll out the almond paste to a 10-inch (25 cm) round 1/16 inch (1.5 mm) thick. Spread the remaining 1 tablespoon (15 ml) of pastry cream on the top of the cake and cover with the round of almond paste.
9. Cover with plastic wrap and refrigerate for at least 4 hours.
10. To serve release the sides of the spring form pan and peel away the plastic wrap.
11. Serve immediately or store in the refrigerator for up to 3 days.


Thanks for visiting Tasty treats! Do try out this recipe, you will definitely be pleased! :-)

April 27, 2011

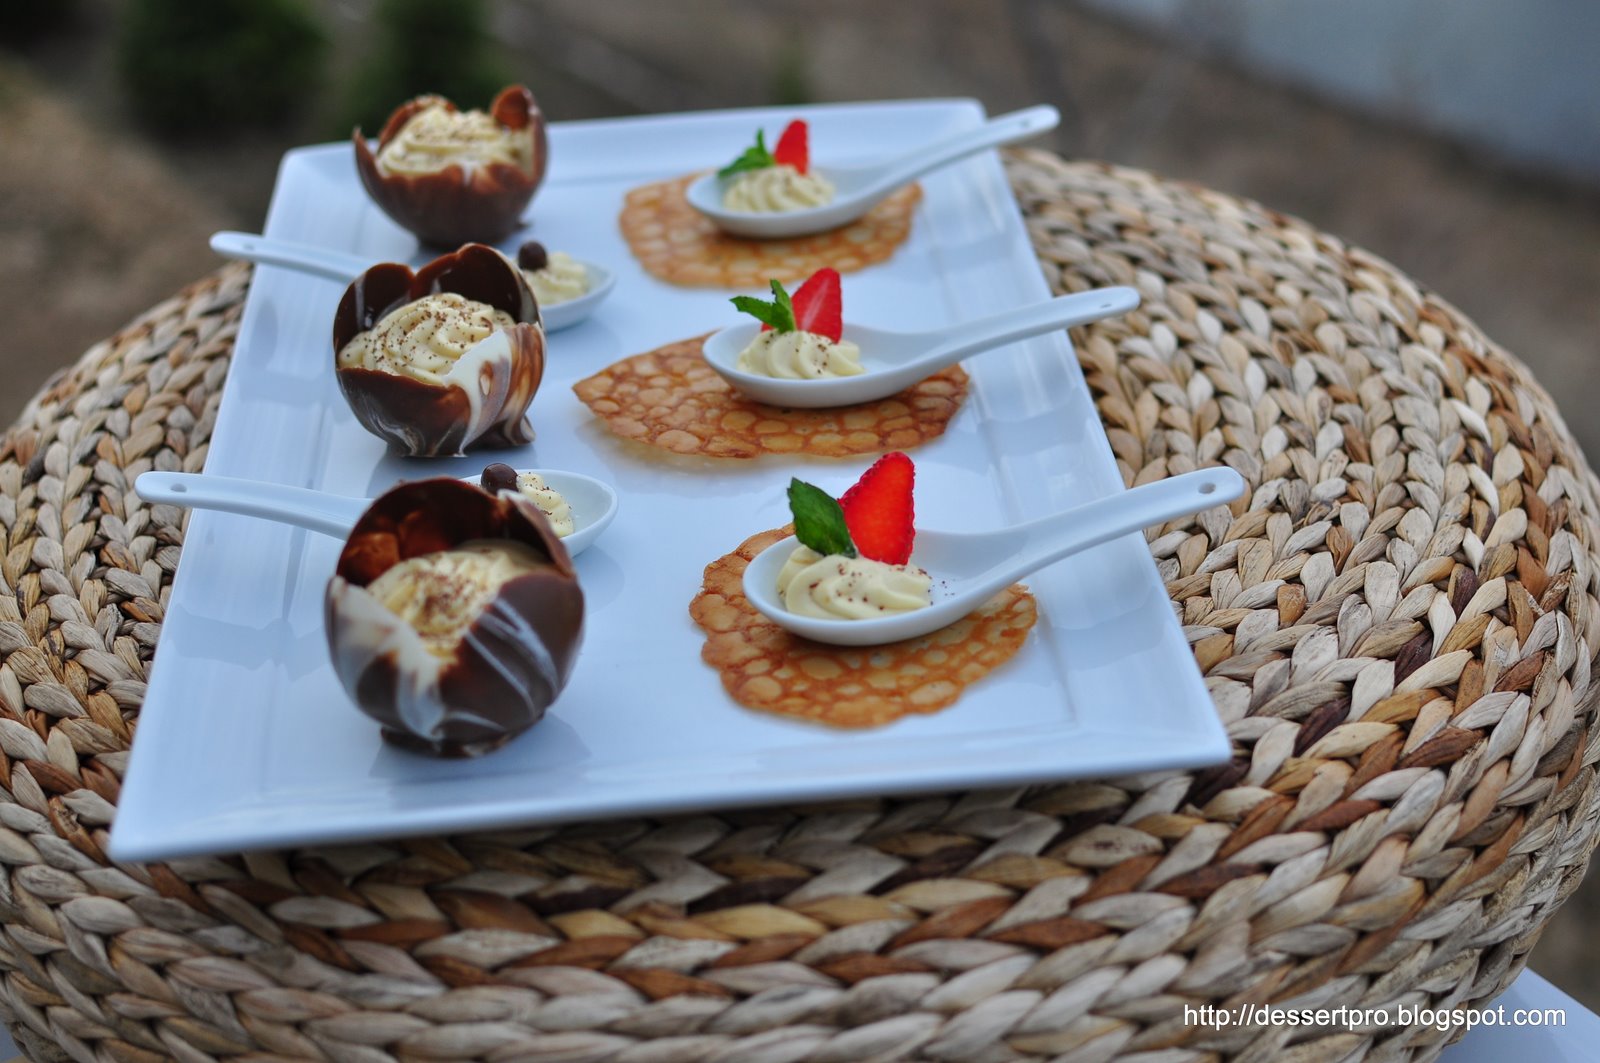
Maple mousse in edible cups for Daring Bakers


The April 2011 Daring Bakers’ challenge was hosted by Evelyne of the blog Cheap Ethnic Eatz. Evelyne chose to challenge everyone to make a maple mousse in an edible container. Prizes are being awarded to the most creative edible container and filling, so vote on your favorite from April 27th to May 27th at http://thedaringkitchen.com/!


Oh yeah!!! I was soo excited to see that there was an award offered this month for the most creative edible container! But it turned to be one of my most uncreative months! Yeah, I did make some fun containers that I have never tried before, but I did not "wow" myself! We did get some very pretty pictures of the mousse and the edible containers, though!! I am very happy with this set of natural light photography! :-)


Now that the time for the challenge is over, I am getting new ideas (ofcourse!!). I think maple mousse truffles covered in tempered chocolate would have been nice! Maybe even a maple mousse cake pop covered in a myriad of colors... A chocolate cage, or a sugar cup.. Oh my! I should've done some of those..... But the best part of this challenge is that I have a new found love towards chocolate art! I am fearless of tempering chocolate and I have great interest in learning about chocolate art now!! The mousse was amazing, it showed me how better pure maple syrup is, how maple flavored syrup cannot capture even remotely the goodness of pure syrup! It was pure heaven in a chocolate cup. The recipe yielded enough mousse to cover dessert for more than a few days!! I am happy with the outcomes of the challenge. The challenge was YUMMMMMMYYY!!! :-)


Bacon Cups:


Ingredients:
24 thin slices good quality bacon
Directions:
1. Pre-heat the oven to 400 degrees F/200 degrees C.
2. Take a muffin pan or 6 small ½ cup capacity heat-proof bowls, turn upside down and carefully form aluminum foil covers on the back of 6 muffin cups or the bowls.
3. Taking 2 strips of bacon at a time crisscross the strips over the backs of the muffin cups and cut to size a tad longer then the bottom part of the cup. Now use 1 to 2 more strips to cover the sides of the muffin cups in a weaving fashion. You want a full tight weave because bacon shrinks a lot. For smaller cups I used a shot glass with a square of bacon for the bottom and I wrapped 1 strip around the side.
4. Tuck the ends of the bacon strips inside otherwise they will curl while cooking. A good idea is to insert 4 toothpicks where the crisscrossed bacon meets in the weave.
5. Place muffin pan in a cookie tray to catch drippings. Bake in oven for about 25 to 40 minutes, or until the bacon is golden and crisp but not burned.
6. Cool completely, a good hour, before removing your cups delicately from the foil.


Nut Bowls:


Ingredients:
 1 1/2 cups crushed nuts of your choice such as almonds, hazelnuts or walnuts
 1 egg, beaten, at room temperature
 2 tablespoon sugar
 1/2 cup dark chocolate pieces
Directions:
1. Use a food processor or a zip-lock back with a rolling pin to crush your nuts if whole, use about 1 cup of whole nuts to get 3/4 cups crushed. You want it somewhat coarse.
2. In a bowl mix the nuts with the beaten egg and the sugar.
3. Take 6 small ½ cup capacity Pyrex cups or a similar container and line the inside with aluminum foil. Spread ¼ cup of the mixture in the bowl, all the way up to the sides making sure you have a thin and even clean layer all around.
4. Bake at 350 degrees F/175 degrees C. until the nuts are golden and fragrant (about 15 minutes). Let cool completely before unmoulding.
5. Melt chocolate (either in the microwave or over a double boiler). Dip the rims of the cooled nut bowls in the chocolate. Place in the freezer for at least 15 minutes or until the chocolate has hardened and is set.


Maple Mousse:
Ingredients:
 1 cup (240 ml/ 8 fluid oz.) pure maple syrup (not maple-flavoured syrup)
 4 large egg yolks
 1 package (7g/1 tbsp.) unflavoured gelatine
 1 1/2 cups (360 ml. g/12 fluid oz) whipping cream (35% fat content)
Directions:
1. Bring maple syrup to a boil then remove from heat.
2. In a large bowl, whisk egg yolks and pour a little bit of the maple syrup in while whisking (this is to temper your egg yolks so they don’t curdle).
3. Add warmed egg yolks to hot maple syrup until well mixed.
4. Measure 1/4 cup of whipping cream in a bowl and sprinkle it with the gelatine. Let it rest for 5 minutes. Place the bowl in a microwave for 45 seconds (microwave for 10 seconds at a time and check it in between) or place the bowl in a pan of barely simmering water, stir to ensure the gelatine has completely dissolved.
5. Whisk the gelatine/whipping cream mixture into the maple syrup mixture and set aside.
6. Whisk occasionally for approximately an hour or until the mixture has the consistency of an unbeaten raw egg white.
7. Whip the remaining cream. Stir 1/4 of the whipped cream into the maple syrup mixture. Fold in the remaining cream and refrigerate for at least an hour.
8. Remove from the fridge and divide equally among your edible containers.


Vegan Maple Mousse:
Ingredients:
 1 package (12 oz.) soft silken tofu
 ¾ cup (14 fluid oz.) pure maple syrup
 2 teaspoon agar-agar
Directions:
1. Let tofu come to room temperature. Using a food processor, blender, or hand mixer, blend tofu until just smooth.
2. Sprinkle agar-agar on the maple syrup and let it rest for 10 minutes. Heat maple syrup on the stove to a boil and then let it simmer 5 minutes until the agar-agar has dissolved.
3. In a food processor, blender, or a large bowl, blend the tofu with the maple syrup until creamy.
4. Refrigerate for at least one hour. Remove from the fridge and divide among your edible containers.


Meringue (optional):
Ingredients:
 3 large egg whites at room temperature
 ¾ cup (165 g./5.5 oz) sugar
Directions:
1. Preheat the oven to 300 degrees F/150 degrees C.
2. Put the egg whites in a large bowl. Using an electric mixer beat for a few minutes until the whites become stiff. Now add the sugar, a little at a time, whisking until the mixture is stiff and glossy. You should be able to turn the bowl upside down and the mixture won’t fall out.
3. Place baking parchment on to a clean baking sheet. Using a spoon or a piping bag, dollop the meringue into circles that fit inside the rim of your edible cups. (See mine, I wanted height but they fell a bit...which is OK...freeform art)
4. Put the tray in the oven, then immediately turn the oven down to 250 degrees F/130 degrees C. and bake for 45 minutes.
5. Turn off the oven and allow the meringues to cool in the oven for a few hours.
6. Place meringues as decoration on your maple mousse which has already be spooned into your edible containers.


Chocolate Tulip cups:


Blow some balloons to the size of an orange or bigger, depending on the size of the desired tulips cups. Melt chocolate in 15s increments in the microwave until melted and smooth. Let the chocolate get to slightly warm temperature. Dip the balloon slightly slanted and overlapping so as to make the petals of the tulips. Hold the balloons vertically on a parchment lined sheet pan for a few seconds and let harden. Gently snip the upper tip of the balloon with scissors and let the air escape slowly. Remove the balloons and fill the chocolate containers with your desired filling and enjoy!


I used light chocolate candy melts (Michaels) and white chocolate chips (Hershey's) swirled together for my tulip cups.


Chocolate cups using cupcake liners:


Melt chocolate at 15s increments in the microwave until melted and smooth and at about 40C. Temper the chocolate using the microwave method (just google!!). Brush a layer of melted tempered chocolate onto the bottom and sides of a cupcake liner placed in a muffin pan. Tempered chocolate will dry quickly and will have a snap to it when broken. Enjoy with your favorite filling!


Sugar Brandy Snaps:


Check out this link for the recipe I used to make sugar brandy snaps. I didn't use brandy or ginger though! :-) I just kept them as flat snaps and I thought they looked stunning!! Follow steps 1-3 for sugar snaps!


The texture and taste of real tempered chocolate is much much better than candy melts. They seemed a bit chewy for my taste whereas the chocolate cups that I made with tempered semisweet chocolate were amazing!! Chocolate and maple mousse go very well together! YUMM!


Candy melts are convenient in that we do not need to go into the trouble of tempering them. They also set pretty quick. They are good in that we can make cut outs and/or mold them a bit easier (I felt) than real chocolate.


My chocolate tulip cups and chocolate cups were satisfying!! Maple mousse was just out of the world! It would have been fine if it was a little less sweet.


Thanks for visiting!! Enjoy your week! Couldn't stop myself from posting all these pictures.. Hope you enjoyed going through the pictures as much as I did presenting them!


March 27, 2011

Chocolate - Almond Yeasted Meringue Coffee Cake for DB Challenge!

The March 2011 Daring Baker’s Challenge was hosted by Ria of Ria’s Collection and Jamie of Life’s a Feast. Ria and Jamie challenged The Daring Bakers to bake a yeasted Meringue Coffee Cake. Here I am posting my finished product eventhough its a day late! Let me just quickly write about how much I LOVED this coffee cake! The dough was very smooth sexy and elastic, as they described it, and very easy to put together and work with. The yeast worked magic on the dough and turned it into the light and airy dough wonder which rose beautifully! The meringue was a breeze to make (I used egg whites from Crystal farms to make the meringue). I rolled out the dough to an approximate size, spread the meringue and chocolate chips with some crushed roasted almonds. The rolling part was a little tricky and messy as the meringue was trying to squish itself out of the dough roll. I managed to roll the dough and used a round condiment bowl to shape the wreath (which resulted in a bit of a lopsided wreath because the ends of the rolls were not filled, and the attachment of the ends was not perfect!). I cut the wreath using a knife deep so as to cut into a few layers, but still left the bottom layer uncut. I brushed the wreath with egg white before baking.

Baked the roll as mentioned for about 25-30 minutes until it was golden brown on the darker side. The result was an amazing and beautiful coffee cake. I didn't have the time or patience to let it cool (was baking at bedtime!). I had a 5yr old clinging to my knees begging for a taste of the coffee cake before she went to bed!! A dusting of cocoa powder and confectioner's sugar completed my coffee cake.


The cake was literally DEVOURED, once I cut into it. Did manage to salvage a few pieces for breakfast the next day and all was gone by then!! I would definitely try this again as the recipe was perfect and easy - light, not overwhelming, not extremely sweet but has all the right ingredients (if you know what I mean - sugar, chocolate and meringue!!). A perfect accompaniment to coffee, as breakfast or a snack!


My only disappointment was not being able to see swirls in the cut piece. A dusting of cocoa or cinnamon over the spread meringue or rolled out dough should do the trick. I will definitely try doing that the next time. I would also like to add some chopped dry fruits to the chocolate chip-nut mixture next time! All in all, I absolutely LOVED this challenge and I did complete it on time eventhough posting a day later!!


FILLED MERINGUE COFFEE CAKE

Makes 2 round coffee cakes, each approximately 10 inches in diameter. The recipe can easily be halved to make one round coffee cake

Ingredients:

For the yeast coffee cake dough:


4 cups (600 g / 1.5 lbs.) flour
¼ cup (55 g / 2 oz.) sugar
¾ teaspoon (5 g / ¼ oz.) salt
1 package (2 ¼ teaspoons / 7 g / less than an ounce) active dried yeast
¾ cup (180 ml / 6 fl. oz.) whole milk ¼ cup (60 ml / 2 fl. oz. water (doesn’t matter what temperature)
½ cup (135 g / 4.75 oz.) unsalted butter at room temperature 2 large eggs at room temperature 10 strands saffron for Ria’s version (Saffron might be hard to find and it’s expensive, so you can substitute with ½ - 1 teaspoon of ground cardamom or ground nutmeg. Or simply leave it plain like Jamie’s version)

For the meringue: 3 large egg whites at room temperature ¼ teaspoon salt ½ teaspoon vanilla ½ cup (110 g / 4 oz.) sugar

For the filling: Jamie’s version: 1 cup (110 g / 4 oz.) chopped pecans or walnuts 2 Tablespoons (30 g / 1 oz.) granulated sugar ¼ teaspoon ground cinnamon 1 cup (170 g / 6 oz.) semisweet chocolate chips or coarsely chopped chocolate

Ria’s version: 1 cup (130 g / 5 oz.) chopped cashew nuts 2 Tablespoons (30 g / 1 oz.) granulated sugar ½ teaspoon garam masala (You can make it at home – recipe below - or buy from any Asian/Indian grocery store) 1 cup (170g / 6 oz.) semisweet chocolate chips ( I used Ghirardelli)

Egg wash: 1 beaten egg
Cocoa powder (optional) and confectioner’s sugar (powdered/icing sugar) for dusting cakes

Directions: Prepare the dough: In a large mixing bowl, combine 1 ½ cups (230 g) of the flour, the sugar, salt and yeast. In a saucepan, combine the milk, water and butter and heat over medium heat until warm and the butter is just melted.


Ria’s version: add the 10 saffron threads to the warmed liquid and allow to steep off of the heat for 10 minutes. This will give the mixture a distinct aroma and flavor and a yellowish-orange hue. With an electric mixer on low speed, gradually add the warm liquid to the flour/yeast mixture, beating until well blended. Increase mixer speed to medium and beat 2 minutes. Add the eggs and 1 cup (150 g) flour and beat for 2 more minutes.

Using a wooden spoon, stir in enough of the remaining flour to make a dough that holds together. Turn out onto a floured surface (use any of the 1 ½ cups of flour remaining) and knead the dough for 8 to 10 minutes until the dough is soft, smooth, sexy and elastic, keeping the work surface floured and adding extra flour as needed.

Place the dough in a lightly greased (I use vegetable oil) bowl, turning to coat all sides. Cover the bowl with plastic wrap and a kitchen towel and let rise until double in bulk, 45 – 60 minutes. The rising time will depend on the type of yeast you use.

Prepare your filling: In a small bowl, combine the cinnamon and sugar for the filling if using. You can add the chopped nuts to this if you like, but I find it easier to sprinkle on both the nuts and the chocolate separately.


Once the dough has doubled, make the meringue: In a clean mixing bowl – ideally a plastic or metal bowl so the egg whites adhere to the side (they slip on glass) and you don’t end up with liquid remaining in the bottom – beat the egg whites with the salt, first on low speed for 30 seconds, then increase to high and continue beating until foamy and opaque. Add the vanilla then start adding the ½ cup sugar, a tablespoon at a time as you beat, until very stiff, glossy peaks form.

Assemble the Coffee Cakes: Line 2 baking/cookie sheets with parchment paper. Punch down the dough and divide in half. On a lightly floured surface, working one piece of the dough at a time (keep the other half of the dough wrapped in plastic), roll out the dough into a 20 x 10-inch (about 51 x 25 ½ cm) rectangle.

Spread half of the meringue evenly over the rectangle up to about 1/2-inch (3/4 cm) from the edges. Sprinkle half of your filling of choice evenly over the meringue (ex: half of the cinnamon-sugar followed by half the chopped nuts and half of the chocolate chips/chopped chocolate).

Now, roll up the dough jellyroll style, from the long side. Pinch the seam closed to seal. Very carefully transfer the filled log to one of the lined cookie sheets, seam side down. Bring the ends of the log around and seal the ends together, forming a ring, tucking one end into the other and pinching to seal.


Using kitchen scissors or a sharp knife (although scissors are easier), make cuts along the outside edge at 1-inch (2 ½ cm) intervals. Make them as shallow or as deep as desired but don’t be afraid to cut deep into the ring.

Repeat with the remaining dough, meringue and fillings. Cover the 2 coffee cakes with plastic wrap and allow them to rise again for 45 to 60 minutes. Preheat the oven to 350°F (180°C). Brush the tops of the coffee cakes with the egg wash. Bake in the preheated oven for 25 to 30 minutes until risen and golden brown.


The dough should sound hollow when tapped. Remove from the oven and slide the parchment paper off the cookie sheets onto the table. Very gently loosen the coffee cakes from the paper with a large spatula and carefully slide the cakes off onto cooling racks. Allow to cool. Just before serving, dust the tops of the coffee cakes with confectioner’s sugar as well as cocoa powder if using chocolate in the filling. These are best eaten fresh, the same day or the next day.


Look at how airy and the light the cake looks! Yeast works magic on the dough! All in all the result was just beautiful - well risen, baked to the right golden brown perfection...

February 11, 2011

Layered Vanilla Panna Cotta and Florentine Cookies!

The February 2011 Daring Bakers’ challenge was hosted by Mallory from A Sofa in the Kitchen. She chose to challenge everyone to make Panna Cotta from a Giada De Laurentiis recipe and Nestle Florentine Cookies.

Unfortunately my computer broke recently (initially thought to be a virus but now it looks like a problem with the hard disk) and I dont have a quick access to any of my pictures! I am just heartbroken because I had put in a lot of effort into these layered pannacotta!! I am trying really hard to recover atleast some of my pictures! Lesson learned for not backing up stuff! Stay tuned and I will post them asap, if I am able to recover them!

UPDATE: I was able to get the pictures that I had posted on Daring Baker's forum. There were a lot of other pictures on my computer. I will try to recover them as soon as I get a chance.

VERDICT: This recipe for pannacotta is simply awesome!! I was not too excited when I first knew of the challenge, but this challenge resulted in such an awesome creamy smooth dessert, I fell in love with pannacotta all over again! The gelee that I made was using Pom Pomegranate-Blueberry juice and the tart gelee worked magic with the smooth creamy and dreamy pannacotta. You can work wonders with the presentation and will leave you satisfied with the results!

The florentine cookies were also amazing! Again, I was not too thrilled about oat cookies, but these were really delicious crisp cookies! The ease of prep work is also something to be mentioned! I will definitely make them again!


Giada's Vanilla Panna Cotta


Ingredients
1 cup (240 ml) whole milk
1 tablespoon (one packet) (15 ml) (7 gm) (¼ oz) unflavored powdered gelatin
3 cups (720 ml) whipping cream (30+% butterfat)
1/3 cup (80 ml) honey
1 tablespoon (15 ml) (15 gm) (½ oz) granulated sugar
pinch of salt

Directions:

1. Pour the milk into a bowl or pot and sprinkle gelatin evenly and thinly over the milk (make sure the bowl/pot is
cold by placing the bowl/pot in the refrigerator for a few minutes before you start making the Panna Cotta). Let
stand for 5 minutes to soften the gelatin.
2. Pour the milk into the saucepan/pot and place over medium heat on the stove. Heat this mixture until it is hot,
but not boiling, about five minutes. (I whisk it a few times at this stage).
3. Next, add the cream, honey, sugar, and pinch of salt. Making sure the mixture doesn't boil, continue to heat and
stir occasionally until the sugar and honey have dissolved 5-7 minutes.
4. Remove from heat, allow it to sit for a few minutes to cool slightly. Then pour into the glass or ramekin.
5. Refrigerate at least 6 hours or overnight. Add garnishes and serve.


Chocolate Panna Cotta:
Recipe adapted from Bon Appetit

Ingredients:
1 cup (240 ml) whole milk
1 tablespoon (15 ml) (7 gm) (¼ oz) unflavored powdered gelatin
2 cups (480 ml) whipping cream (30+% butterfat)
½ cup (115 gm) (4 oz) sugar
¾ cup (145 gm)(5 oz) bittersweet or semisweet chocolate
½ teaspoon (2½ ml) vanilla extract
Directions:
1. Pour milk into a small bowl, sprinkle gelatin over the top, set aside for 2-5 minutes.
2. Place a medium saucepan over medium heat, stir in cream, sugar and vanilla. Bring to a low boil.
3. Add chocolate and whisk until melted. Whisk the milk/gelatin mixture into chocolate cream mixture. Whisk until gelatin has dissolved.
4. Transfer to ramekins, or nice glasses for serving.
5. Cover and chill at least 8 hours, or overnight.


Nestle Florentine Cookies:
Recipe from the cookbook “Nestle Classic Recipes”, and their website.

Ingredients:

2/3 cup (160 ml) (150 gm) (5.3 oz) unsalted butter
2 cups (480 ml) (160 gm) (5 2/3 oz) quick oats
1 cup (240 ml) (230 gm) (8 oz) granulated sugar
2/3 cup (160 ml) (95 gm) (3⅓ oz) plain (all purpose) flour
1/3 cup (60 ml) dark corn syrup
1/4 cup (60 ml) whole milk
1 tsp (5 ml) vanilla extract
pinch of salt
1½ cups (360 ml) (250 gm) (9 oz) dark or milk chocolate

Directions:
Preheat oven to moderately hot 375°F (190°C) (gas mark 5). Prepare your baking sheet with silpat or parchment paper.
1. Melt butter in a medium saucepan, then remove from the heat.
2. To the melted butter add oats, sugar, flour, corn syrup, milk, vanilla, and salt. Mix well.
Drop a tablespoon full, three inches (75 mm) apart, onto your prepared baking sheet. Flatten slightly with the back of your tablespoon, or use a spatula.
3. Bake in preheated oven for 6-8 minutes, until cookies are golden brown. Cool completely on the baking sheets.
4. While the cookies are cooling melt your chocolate until smooth either in the microwave (1 1/2 minutes), or stovetop (in a double boiler, or a bowl that fits atop a saucepan filled with a bit of water, being sure the water doesn't touch the bottom of the bowl).
5. Peel the cookies from the silpat or parchment and place face down on a wire rack set over a sheet of wax/parchment paper (to keep counters clean).
6. Spread a tablespoon of chocolate on the bottom/flat side of your cookie, sandwiching another (flat end) cookie atop the chocolate.
This recipe will make about 2 1/2 - 3 dozen sandwiched Florentine cookies. You can also choose not to sandwich yours, in which case, drizzle the tops with chocolate (over your wax paper).


Coffee Gelée:
Adapted from this recipe in Gourmet Magazine

Ingredients:

2 cups (480 ml) good quality brewed coffee
1/4 cup (60 ml) hot water + 2 tablespoons (30 ml) cold water
1/2 cup (120 ml) (115 gm) (4 oz) granulated sugar
1½ teaspoons (7½ ml) (3½ gm) (1/8 oz) unflavored powdered gelatin
2 teaspoons (10 ml) vanilla extract

Directions:
1. Place granulated sugar and 1/4 c. hot water in a small saucepan. Bring to a boil, stir until the sugar has dissolved.
2. Sprinkle gelatin over 2 Tablespoons cold water and let it soften 2 minutes or so.
3. Stir the coffee, sugar, hot water, and vanilla into a small metal bowl, add gelatin mixture and stir well until gelatin has dissolved. If pouring over Panna Cotta, be sure that this mixture is no longer hot, it will melt Panna Cotta if it is, let it come to room temperature.


Fruit Gelée:
Recipe by Mallory

Ingredients:

1 cup (240 ml) (230 gm) (8 oz) fruit (strawberries, raspberries, mango, blackberry, etc.)
*Note: Certain fruits interact with gelatin and stop it gelling like pineapple and kiwi etc.
3 tablespoons (45 ml) water
1/4 cup (60 ml) (60 gm) (2 oz) granulated sugar
1½ teaspoons (7½ ml) (3½ gm) (1/8 oz) unflavored powdered gelatin

Directions:
1. Sprinkle gelatin over water.
2. Place fruit and sugar in a small saucepan and simmer until sugar has dissolved. Now mix the gelatin into the strawberry mixture and stir until gelatin has dissolved.
3. Remove from heat and allow to cool (close to room temp, again, if you're planning on layering on pouring on top of your Panna Cotta, a hot mixture will also heat up your chilled Panna Cotta).

January 27, 2011

Biscuit Joconde Imprime for Daring Bakers- My 25th Challenge!!


The January 2011 Daring Bakers’ challenge was hosted by Astheroshe of the blog accro. She chose to challenge everyone to make a Biscuit Joconde Imprime to wrap around an Entremets dessert.

Here it is! My attempt at the Joconde imprime filled to make an entremet! This challenge was really exciting since this was something I've never done before! The patterns that I came across on the net were amazing and eventhough mine didnt turn out as good as I had hoped, I am still happy with my attempt. The whole process went fine, but what I learned is that if we are making a pattern with chocolate paste and plain cake mix, the chocolate paste has to be really dark to give stunning patterns. I just eyeballed the recipe and so ended up with light chocolate paste, which still gave good patterns. I made swirls, dots and stripes, both with brown and pink tinted paste, but the chocolate striped one turned out the best.

I loved learning the technique and am proud to have completed another daring challenge! :-)I filled the biscuit joconde with chocolate mousse and decorated it with chocolate whipped cream and chocolate art as garnishes!


Joconde Sponge

YIELD: Two ½ size sheet pans or a 13” x 18” (33 x 46 cm) jelly roll pan

Ingredients:
¾ cup/ 180 ml/ 3oz/ 85g almond flour/meal - *You can also use hazelnut flour, just omit the butter
½ cup plus 2 tablespoons/ 150 ml/ 2⅔ oz/ 75g confectioners' (icing) sugar
¼ cup/ 60 ml/ 1 oz/ 25g cake flour *See note below
3 large eggs - about 5⅓ oz/ 150g
3 large egg whites - about 3 oz/ 90g
2½ teaspoons/ 12½ ml/ ⅓ oz/ 10g white granulated sugar or superfine (caster) sugar
2 tablespoons/ 30 ml/ 1oz / 30g unsalted butter, melted


*Note: How to make cake flour: http://www.joythebaker.com/blog/2009/09/how-to-make-cake-flour/

Directions:

  1. In a clean mixing bowl whip the egg whites and white granulated sugar to firm, glossy peeks. Reserve in a separate clean bowl to use later.
  2. Sift almond flour, confectioner’s sugar, cake flour. (This can be done into your dirty egg white bowl)
  3. On medium speed, add the eggs a little at a time. Mix well after each addition. Mix until smooth and light. (If using a stand mixer use blade attachment. If hand held a whisk attachment is fine, or by hand. )
  4. Fold in one third reserved whipped egg whites to almond mixture to lighten the batter. Fold in remaining whipped egg whites. Do not over mix.
  5. Fold in melted butter.
  6. Reserve batter to be used later.

Patterned Joconde-Décor Paste

YIELD: Two ½ size sheet pans or a 13” x 18” (33 x 46 cm) jelly roll pan

Ingredients
14 tablespoons/ 210ml/ 7oz/ 200g unsalted butter, softened
1½ cups plus1½ tablespoons/ 385ml/ 7oz/ 200g Confectioners' (icing) sugar
7 large egg whites - about 7 oz / 200g
1¾ cup/ 420ml/ 7¾ oz/ 220g cake flour
Food coloring gel, paste or liquid

COCOA Décor Paste Variation: Reduce cake flour to 6 oz / 170g. Add 2 oz/ 60 g cocoa powder. Sift the flour and cocoa powder together before adding to creamed mixture.

Directions:

  1. Cream butter and sugar until light and fluffy (use stand mixer with blade, hand held mixer, or by hand)
  2. Gradually add egg whites. Beat continuously.
  3. Fold in sifted flour.
  4. Tint batter with coloring to desired color, if not making cocoa variation.

Preparing the Joconde- How to make the pattern:

  1. Spread a thin even layer of décor paste approximately 1/4 inch (5 millimeter) thick onto silicone baking mat with a spatula, or flat knife. Place mat on an upside down baking sheet. The upside down sheet makes spreading easier with no lip from the pan.
  2. Pattern the décor paste – Here is where you can be creative. Make horizontal /vertical lines (you can use a knife, spatula, cake/pastry comb). Squiggles with your fingers, zig zags, wood grains. Be creative whatever you have at home to make a design can be used. OR use a piping bag. Pipe letters, or polka dots, or a piped design. If you do not have a piping bag. Fill a ziplock bag and snip off corner for a homemade version of one.
      1. Slide the baking sheet with paste into the freezer. Freeze hard. Approx 15 minutes.
      2. Remove from freezer. Quickly pour the Joconde batter over the design. Spread evenly to completely cover the pattern of the Décor paste.
      3. Bake at 475ºF /250ºC until the joconde bounces back when slightly pressed, approx. 15 minutes. You can bake it as is on the upside down pan. Yes, it is a very quick bake, so watch carefully.
      4. Cool. Do not leave too long, or you will have difficulty removing it from mat.
      5. Flip cooled cake on to a powdered sugared parchment paper. Remove silpat. Cake should be right side up, and pattern showing! (The powdered sugar helps the cake from sticking when cutting.)


      6. Preparing the MOLD for entremets:

        You can use any type of mold. I would suggest:

      7. Start with a large piece of parchment paper laid on a very flat baking sheet. Then a large piece of cling wrap over the parchment paper. Place a spring form pan ring, with the base removed, over the cling wrap and pull the cling wrap tightly up on the outside of the mold. Line the inside of the ring with a curled piece of parchment paper overlapping top edge by ½ inch. CUT the parchment paper to the TOP OF THE MOLD. It will be easier to smooth the top of the cake.
      8. A biscuit cutter/ cookie cutter- using cling wrap pulled tightly as the base and the cling covering the outside of the mold, placed on a parchment lined very flat baking sheet. Line the inside with a curled piece of parchment paper overlapping.
      9. Cut PVC pipe from your local hardware store. Very cheap! These can be cut into any height you wish to make a mold. 2 to 3 inches is good. My store will cut them for me, ask an employee at your store. You can get several for matching individual desserts. Cling wrap and parchment line, as outlined above.


Check out all my previous Daring Baker challenges here. I am proud to have completed my 25th Daring Baker Challenge successfully!

Go DBers! Have a great day!

October 27, 2010

Yeast Doughnuts for Daring Baker's Challenge!

The October 2010 Daring Bakers challenge was hosted by Lori of Butter Me Up. Lori chose to challenge DBers to make doughnuts. She used several sources for her recipes including Alton Brown, Nancy Silverton, Kate Neumann and Epicurious.

Yes!! I did it on time! Its been a couple of months since I've posted on the blog, and I've missed a few of the challenges as well... But I'm more than happy to be back, that too with a successful completion of the challenge! There is a reason I've highlighted the word "successful". Its because it had every reason to be the opposite when I attempted the challenge! Of course, I kind of "planned' it for the last minute.. Starting the challenge the evening before the posting date is never easy.. My little girl's school harvest festival being on the same evening didn't help much! We just went through a move (Yay! We are in our new home!!) and my baking/measuring stuff are still somewhere in the boxes.. Eyeballing 2/3 cup of flour is not fun! And the weather has gone berserk here- extremely windy, rainy and a bit cold. Doughnuts rising well..? I didn't think so! Ages old yeast also added to the chaos...


But even after everything that could've gone wrong, I completed the challenge - "successfully". The yeast didn't froth initially, but I still went ahead with making the dough. I didn't have a stand mixer, so I just mixed with a spoon and then later kneaded the dough a bit. But it came together in just a few minutes, nice, soft and smooth! I left the dough in the pre-warmed oven to help it rise a bit and left for my little one's school. But the dough didn't seem to have risen (maybe it did a bit!?) when I came back, but since there was no going back, I rolled the dough out and cut out the doughnuts.

I just wanted to test whether the doughnuts would be any good with the seemingly flat dough! But it wasn't as bad as I thought and showed some promise. So I cut out the rest of the doughnuts and let it sit in a warmed oven for about 30 minutes. I didn't have a thermometer so again, it was hard keeping the temperature constant. Anyways, the doughnuts fried beautifully to a golden brown color quickly and was crisp on the outside with a yeasty chewy inside. I was surprised at how "well-rounded" they got once they were in the oil. My only issue was many of them cracking open in the oil (which I assumed was due to the oil being heated up too much?).

Anyways, despite everything, the doughnuts turned out really nice. I really didn't know how to dress up a doughnut, so a sprinkle of powdered sugar did the trick well..

I think this is a very solid recipe which would give consistent results and even after so many drawbacks, I got it right! I'm happy to be back, and that too with some handsome doughnuts!


Yeast Doughnuts:

Preparation time:

Hands on prep time - 25 minutes
Rising time - 1.5 hours total
Cooking time - 12 minutes
Yield: 20 to 25 doughnuts & 20 to 25 doughnut holes, depending on size

Ingredients

Milk 1.5 cup / 360 ml
Vegetable Shortening 1/3 cup / 80 ml / 70 gm / 2.5 oz (can substitute butter, margarine or lard) Active Dry Yeast 4.5 teaspoon (2 pkgs.) / 22.5 ml / 14 gm / ½ oz
Warm Water 1/3 cup / 80 ml (95°F to 105°F / 35°C to 41°C)
Eggs, Large, beaten 2
White Granulated Sugar ¼ cup / 60 ml / 55 gm / 2 oz
Table Salt 1.5 teaspoon / 7.5 ml / 9 gm / 1/3 oz
Nutmeg, grated 1 tsp. / 5 ml / 6 gm / ¼ oz
All Purpose Flour 4 2/3 cup / 1,120 ml / 650 gm / 23 oz + extra for dusting surface
Canola Oil DEPENDS on size of vessel you are frying in – you want THREE (3) inches of oil
(can substitute any flavorless oil used for frying)


Directions:

1. Place the milk in a medium saucepan and heat over medium heat just until warm enough to melt the shortening. (Make sure the shortening is melted so that it incorporates well into the batter.)

2. Place the shortening in a bowl and pour warmed milk over. Set aside.

3. In a small bowl, sprinkle the yeast over the warm water and let dissolve for 5 minutes. It should get foamy. After 5 minutes, pour the yeast mixture into the large bowl of a stand mixer and add the milk and shortening mixture, first making sure the milk and shortening mixture has cooled to lukewarm.

4. Add the eggs, sugar, salt, nutmeg, and half of the flour. Using the paddle attachment of your mixer (if you have one), combine the ingredients on low speed until flour is incorporated and then turn the speed up to medium and beat until well combined.

5. Add the remaining flour, combining on low speed at first, and then increase the speed to medium and beat well.

6. Change to the dough hook attachment of the mixer and beat on medium speed until the dough pulls away from the bowl and becomes smooth, approximately 3 to 4 minutes (for me this only took about two minutes). If you do not have a dough hook/stand mixer – knead until the dough is smooth and not sticky.

7. Transfer to a well-oiled bowl, cover, and let rise for 1 hour or until doubled in size.

8. On a well-floured surface, roll out dough to 3/8-inch (9 mm)thick. (Make sure the surface really is well-floured otherwise your doughnuts will stick to the counter).

9. Cut out dough using a 2 1/2-inch (65 mm) doughnut cutter or pastry ring or drinking glass and using a 7/8-inch (22 mm) ring for the center whole. Set on floured baking sheet, cover lightly with a tea towel, and let rise for 30 minutes.

10. Preheat the oil in a deep fryer or Dutch oven to 365 °F/185°C.

11. Gently place the doughnuts into the oil, 3 to 4 at a time. Cook for 1 minute per side or until golden brown (my doughnuts only took about 30 seconds on each side at this temperature).

12. Transfer to a cooling rack placed in baking pan. Allow to cool for 15 to 20 minutes prior to glazing, if desired.


Bomboloni


Preparation time:
Hands on prep time - 35 minutes
Rising time - 1 1/2 hours plus overnight
Cooking time - 10 minutes
Yield: About 32 Bomboloni

Ingredients

Water, Lukewarm 1/3 cup + 1 Tablespoon
Active Dry Yeast 3 ¼ teaspoon (1.5 pkgs.) / 16.25 ml / 10 gm / .35 oz
Honey 1.5 Tablespoon / 22.5 ml
All Purpose Flour 3 cup / 720 ml / 420 gm / 14 ¾ oz
Milk 3 Tablespoon / 45 ml
Egg Yolk, Large 6
White Granulated Sugar 1/3 cup / 80 ml / 75 gm / 2 2/3 oz + more for rolling
Kosher (Flaked) Salt 2 teaspoon / 10 ml / 6 gm / .2 oz
Butter, Unsalted 3 Tablespoon / 45 ml / 42 gm / 1.5 oz
Canola Oil 3 cup / 720 ml / (Or any other flavorless oil used for frying)
Raspberry Jam, Seedless ¾ cup / 180 ml / 300 gm / 10.5 oz (or any flavor jam, preserves, jelly)

Directions:

1. In the bowl of a standing electric mixer, mix the water, yeast, honey and 1 cup plus 2 tablespoons (160 gm) of the flour. (Alternatively, whisk the ingredients by hand.) Cover with plastic wrap and let stand at room temperature until foamy, about 1 hour.

2. Return the bowl to the mixer, fitted with a dough hook. Add the remaining 1 ¾ cups plus 2 tablespoons (260 gm) of flour, along with the milk, egg yolks, 1/3 cup of granulated sugar and the salt. Mix at low speed until blended, then add the butter and knead at medium speed until silky but sticky, about 5 minutes; the dough will not pull away from the side of the bowl.

3. Using an oiled spatula, scrape the dough into an oiled bowl and cover with plastic wrap. Refrigerate overnight.

4. In a large saucepan, heat the canola oil to 360°F/180°C. Line a rack with paper towels. Fill a shallow bowl with 1/2 inch (12 mm)of granulated sugar. On a lightly floured surface, roll out the dough a scant 1/2 inch (12 mm) thick. Using a 2-inch (50 mm) round biscuit cutter, stamp out rounds. The original recipe said to not re-roll the dough, but I did and found it to be fine. Fry the rounds, 4 to 5 at a time, until they are browned, about 4 minutes (mine only took about a minute each – try to go more by sight). Be sure to keep the oil between 360°F and 375°F 180°C and 190°C. Drain the bomboloni on paper towels.

5. Roll them in the granulated sugar.

Filling Directions:

Fit a pastry bag with a plain donut tip (or a 1/4-inch (6 mm) tip) and fill with the preserves (you can also use a squeeze bottle). Poke the tip three-fourths of the way into the bomboloni and squeeze in the preserves, pulling the tip out slightly as you squeeze to fill them as much as possible. Serve warm.


Thanks for visiting me today! Have a great day!

July 27, 2010

Swiss Swirl Icecream Cake for DB Challenge!


The July 2010 Daring Bakers’ challenge was hosted by Sunita of Sunita’s world – life and food. Sunita challenged everyone to make an ice-cream filled Swiss roll that’s then used to make a bombe with hot fudge. Her recipe is based on an ice cream cake recipe from Taste of Home.


I finally got around to attempting this challenge last weekend. I was disappointed that I couldn't do last month's challenge, so I made sure that I did this one.. The baking part with the two swiss rolls went fine. I should say that never before have my swiss rolls been this soft and tasty. I particularly loved the fact that the filling was light Chantilly cream and not the heavy over-sweet buttercream or jam! The only thing that I felt I would change was the amount of cream used because I felt that the recipe given kind of over-stuffed the roll. But nevertheless, it was delicious and light! I guess since I used a smaller bowl to assemble the icecream cake, almost the whole second roll was excess for me (no regrets there, anyways!!).


I didn't get to go too creative with the icecream flavors. I went with the recipes given kind of "settling" for the vanilla icecream and chocolate icecream as the two flavors (eventhough my longing was to make rose-flavored and pistachio flavored icecreams!!). I used icecream maker to make both icecreams! I really didnt like the taste of the fudge sauce alone, but everything came together in the end. I felt that it tasted just like it was- sweetend water with cocoa! Maybe it would have been better if we had made some chocolate ganache for the filling!


I assembled the cake slices and the vanilla icecream on Sunday. I also made the Chocolate icecream. I was planning to make the fudge sauce and assemble the rest of the cake on the evening before the challenge reveal date. Unfortunately, when I came back home I found that the freezer wasn't closed properly and that the cake/vanilla icecream was soft!!! I still made the fudge sauce, waited a while for it to cool down and keeping my fingers crossed added the slightly warm sauce on top the vanilla icecream! Ofcourse, there is a reason for every instruction in the recipe, the sauce melted the icecream a bit and kind of became gooey. But I just hoped that too much damage wasn't done. I waited for an hour, but the icecream/fudge had still not set, but I added the softened chocolate icecream on top and just hoped that I would still have the three separate layers when I cut into the icecream cake.


I had to wait till evening today so that the cake could harden and I could take pictures once I came back from work. The unmolding was quick, and I decorated the cake with some cherries, shaved chocolate and sugar-frosted cherries on top. My cake slices were not clean - maybe I should have partially frozen the swiss roll before cutting into slices which would have made lesser smearing of cream on the cake. But other than that everything looked good and I was happy with the icecream cake.


VERDICT: Today was the best day for this icecream cake because the weather was unbearably hot in MN and there even was a heat advisory!! The thought of the icecream cake got me through the harsh evening commute! The icecream cake was perfect for this hot day. It was delicious, sweet and cold, everything you would expect from an icecream cake. Maybe its just me, but I wasn't "wow"ed by it though! I felt that the cake was a little bland tasting once it absorbed a bit of moisture or maybe it was because of freeze thawing!? Who knows, maybe it was because my swirl slices almost completely thawed because of the freezer mishap! A delight for sure for the eyes because of its layers, but somehow didn't rise to my expectations. I honestly felt that the individual elements worked better for me separately... We would give a 7.5/10 for this cake..


But one thing is for sure, it was a hit with my daughter! She rarely asks for seconds (be it any kind of food, including desserts!) but she wanted an additional piece of the icecream cake!


Swiss roll ice cream cake


inspired by the recipe of the same name from the Taste of Home website)

Swiss rolls - Recipe

Preparation time- 10 minutes
Baking time- 10-12 minutes
Rolling and cooling time- at least 30 minutes
Filling-5-8 minutes
Filling and rolling- 5-10 minutes

Ingredients-

6 medium sized eggs
1 C / 225 gms caster sugar /8 oz+ extra for rolling
6 tblsp / 45gms/ a pinch over 1.5 oz of all purpose (plain) flour + 5 tblsp/40gm /a pinch under 1.5 oz of natural unsweetened cocoa powder, sifted together
2 tblsp /30ml / 1 fl oz of boiling water
a little oil for brushing the pans

For the filling-

2C / 500 mls/ 16 fl oz of whipping cream
1 vanilla pod, cut into small pieces of about ½ cm (or 1 tsp vanilla extract)
5 tblsp / 70gms/2.5oz of caster sugar

Method-

1. Pre heat the oven at 200 deg C /400 deg F approximately. Brush the baking pans ( 11 inches by 9 inches ) with a little oil and line with greaseproof baking paper. If you have just one pan, bake one cake and then let the pan cool completely before using it for the next cake.

2. In a large mixing bowl, add the eggs and sugar and beat till very thick; when the beaters are lifted, it should leave a trail on the surface for at least 10 seconds.

3. Add the flour mixture, in three batches and fold in gently with a spatula. Fold in the water.


4. Divide the mixture among the two baking pans and spread it out evenly, into the corners of the pans.

5. Place a pan in the centre of the pre heated oven and bake for about 10-12 minutes or till the centre is springy to the touch.

6. Spread a kitchen towel on the counter and sprinkle a little caster sugar over it.

7. Turn the cake on to the towel and peel away the baking paper. Trim any crisp edges.

8. Starting from one of the shorter sides, start to make a roll with the towel going inside. Cool the wrapped roll on a rack, seam side down.

9. Repeat the same for the next cake as well.

10. Grind together the vanilla pieces and sugar in a food processer till nicely mixed together. If you are using vanilla extract, just grind the sugar on its own and then add the sugar and extract to the cream.

11. In a large bowl, add the cream and vanilla-sugar mixture and beat till very thick.

12. Divide the cream mixture between the completely cooled cakes.

13. Open the rolls and spread the cream mixture, making sure it does not go right to the edges (a border of ½ an inch should be fine).

14. Roll the cakes up again, this time without the towel. Wrap in plastic wrap and chill in the fridge till needed, seam side down.


Vanilla ice cream

Preparation time-5 minutes+freezing

Ingredients-

2 and ½ C / 625 ml / 20 fl oz of whipping cream
1 vanilla bean, minced or 1 tsp/ 5 ml/ .15 fl oz vanilla extract
½ C / 115gms/ 4 oz of granulated sugar

Method-

1. Grind together the sugar and vanilla in a food processor. In a mixing bowl, add the cream and vanilla –sugar mixture and whisk lightly till everything is mixed together. If you are using the vanilla extract, grind the sugar on its own and then and the sugar along with the vanilla extract to the cream.

2. Pour into a freezer friendly container and freeze till firm around the edges. Remove from the freezer, beat till smooth and return to the freezer. Do this 3-4 times and then set completely.

Hot fudge sauce

Preparation time-2 minutes
Cooking time-2 minutes

Ingredients-

1 C / 230gms/ 8 oz of caster sugar
3 tblsp / 24gms/1.5 oz of natural unsweetened cocoa powder
2 tblsp /15gms/ 1 oz of cornflour/cornstarch
1 and ½ C /355ml /12 fl oz of water
1 tblsp /14gms/ 1 oz butter
1 tsp/5 ml / .15 fl oz vanilla extract

Method-

1. In a small saucepan, whisk together the sugar, cocoa powder, cornflour and water.

2. Place the pan over heat, and stir constantly, till it begins to thicken and is smooth (for about 2 minutes).

3. Remove from heat and mix in the butter and vanilla. Keep aside to cool .


Chocolate ice cream

Preparation time- 5 minutes + freezing

Ingredients-

2C/ 500 ml whipping cream
1 C/230gms/8 oz caster sugar
3 tblsp/ 24 gms/1.5 oz of natural unsweetened cocoa powder

Method-

1. Grind together the sugar and the cocoa powder in a food processor .

2. In a saucepan, add all the ingredients and whisk lightly.

3. Place the pan over heat and keep stirring till it begins to bubble around the edges.

4. Remove from heat and cool completely before transferring to a freezer friendly container till firm around the edges. If you are using an ice cream maker, churn the ice cream according to the manufacturer’s instruction, after the mixture has cooled completely.

5. Remove from the freezer, beat till smooth and return to the freezer. Do this 3-4 times and then set completely.


Assembly

1. Cut the Swiss rolls into 20 equal slices ( approximately 2 cms each ).

2. Cover the bottom and sides of the bowl in which you are going to set the dessert with cling film/plastic wrap.

3. Arrange two slices at the bottom of the pan, with their seam sides facing each other. Arrange the Swiss roll slices up the bowl, with the seam sides facing away from the bottom, to cover the sides of the bowl. Cover the bowl with plastic wrap and freeze till the slices are firm (at least 30 minutes).

4. Soften the vanilla ice cream. Take the bowl out of the freezer, remove the cling film cover and add the ice cream on top of the cake slices. Spread it out to cover the bottom and sides of the bowl. Cover the bowl with plastic wrap and freeze till firm ( at least 1 hour).

5. Add the fudge sauce over the vanilla ice cream, cover and freeze till firm . ( at least an hour).

6. Soften the chocolate ice cream and spread it over the fudge sauce. Cover with plastic wrap and freeze for at least 4-5 hours till completely set .

7. Remove the plastic cover, and place the serving plate on top of the bowl. Turn it upside down and remove the bowl and the plastic lining. If the bowl does not come away easily, wipe the outsides of the bowl with a kitchen towel dampened with hot water. The bowl will come away easily.

8. Keep the cake out of the freezer for at least 10 minutes before slicing, depending on how hot your region is. Slice with a sharp knife, dipped in hot water.


Thank you Sunita, for a wonderful and interesting challenge!


style="font-family:trebuchet ms;">Thanks for visiting me today! Have a great week ahead! I will be back soon with the decorating details of a cake that I made for a dinner party!!