March 27, 2011

Chocolate - Almond Yeasted Meringue Coffee Cake for DB Challenge!

The March 2011 Daring Baker’s Challenge was hosted by Ria of Ria’s Collection and Jamie of Life’s a Feast. Ria and Jamie challenged The Daring Bakers to bake a yeasted Meringue Coffee Cake. Here I am posting my finished product eventhough its a day late! Let me just quickly write about how much I LOVED this coffee cake! The dough was very smooth sexy and elastic, as they described it, and very easy to put together and work with. The yeast worked magic on the dough and turned it into the light and airy dough wonder which rose beautifully! The meringue was a breeze to make (I used egg whites from Crystal farms to make the meringue). I rolled out the dough to an approximate size, spread the meringue and chocolate chips with some crushed roasted almonds. The rolling part was a little tricky and messy as the meringue was trying to squish itself out of the dough roll. I managed to roll the dough and used a round condiment bowl to shape the wreath (which resulted in a bit of a lopsided wreath because the ends of the rolls were not filled, and the attachment of the ends was not perfect!). I cut the wreath using a knife deep so as to cut into a few layers, but still left the bottom layer uncut. I brushed the wreath with egg white before baking.

Baked the roll as mentioned for about 25-30 minutes until it was golden brown on the darker side. The result was an amazing and beautiful coffee cake. I didn't have the time or patience to let it cool (was baking at bedtime!). I had a 5yr old clinging to my knees begging for a taste of the coffee cake before she went to bed!! A dusting of cocoa powder and confectioner's sugar completed my coffee cake.


The cake was literally DEVOURED, once I cut into it. Did manage to salvage a few pieces for breakfast the next day and all was gone by then!! I would definitely try this again as the recipe was perfect and easy - light, not overwhelming, not extremely sweet but has all the right ingredients (if you know what I mean - sugar, chocolate and meringue!!). A perfect accompaniment to coffee, as breakfast or a snack!


My only disappointment was not being able to see swirls in the cut piece. A dusting of cocoa or cinnamon over the spread meringue or rolled out dough should do the trick. I will definitely try doing that the next time. I would also like to add some chopped dry fruits to the chocolate chip-nut mixture next time! All in all, I absolutely LOVED this challenge and I did complete it on time eventhough posting a day later!!


FILLED MERINGUE COFFEE CAKE

Makes 2 round coffee cakes, each approximately 10 inches in diameter. The recipe can easily be halved to make one round coffee cake

Ingredients:

For the yeast coffee cake dough:


4 cups (600 g / 1.5 lbs.) flour
¼ cup (55 g / 2 oz.) sugar
¾ teaspoon (5 g / ¼ oz.) salt
1 package (2 ¼ teaspoons / 7 g / less than an ounce) active dried yeast
¾ cup (180 ml / 6 fl. oz.) whole milk ¼ cup (60 ml / 2 fl. oz. water (doesn’t matter what temperature)
½ cup (135 g / 4.75 oz.) unsalted butter at room temperature 2 large eggs at room temperature 10 strands saffron for Ria’s version (Saffron might be hard to find and it’s expensive, so you can substitute with ½ - 1 teaspoon of ground cardamom or ground nutmeg. Or simply leave it plain like Jamie’s version)

For the meringue: 3 large egg whites at room temperature ¼ teaspoon salt ½ teaspoon vanilla ½ cup (110 g / 4 oz.) sugar

For the filling: Jamie’s version: 1 cup (110 g / 4 oz.) chopped pecans or walnuts 2 Tablespoons (30 g / 1 oz.) granulated sugar ¼ teaspoon ground cinnamon 1 cup (170 g / 6 oz.) semisweet chocolate chips or coarsely chopped chocolate

Ria’s version: 1 cup (130 g / 5 oz.) chopped cashew nuts 2 Tablespoons (30 g / 1 oz.) granulated sugar ½ teaspoon garam masala (You can make it at home – recipe below - or buy from any Asian/Indian grocery store) 1 cup (170g / 6 oz.) semisweet chocolate chips ( I used Ghirardelli)

Egg wash: 1 beaten egg
Cocoa powder (optional) and confectioner’s sugar (powdered/icing sugar) for dusting cakes

Directions: Prepare the dough: In a large mixing bowl, combine 1 ½ cups (230 g) of the flour, the sugar, salt and yeast. In a saucepan, combine the milk, water and butter and heat over medium heat until warm and the butter is just melted.


Ria’s version: add the 10 saffron threads to the warmed liquid and allow to steep off of the heat for 10 minutes. This will give the mixture a distinct aroma and flavor and a yellowish-orange hue. With an electric mixer on low speed, gradually add the warm liquid to the flour/yeast mixture, beating until well blended. Increase mixer speed to medium and beat 2 minutes. Add the eggs and 1 cup (150 g) flour and beat for 2 more minutes.

Using a wooden spoon, stir in enough of the remaining flour to make a dough that holds together. Turn out onto a floured surface (use any of the 1 ½ cups of flour remaining) and knead the dough for 8 to 10 minutes until the dough is soft, smooth, sexy and elastic, keeping the work surface floured and adding extra flour as needed.

Place the dough in a lightly greased (I use vegetable oil) bowl, turning to coat all sides. Cover the bowl with plastic wrap and a kitchen towel and let rise until double in bulk, 45 – 60 minutes. The rising time will depend on the type of yeast you use.

Prepare your filling: In a small bowl, combine the cinnamon and sugar for the filling if using. You can add the chopped nuts to this if you like, but I find it easier to sprinkle on both the nuts and the chocolate separately.


Once the dough has doubled, make the meringue: In a clean mixing bowl – ideally a plastic or metal bowl so the egg whites adhere to the side (they slip on glass) and you don’t end up with liquid remaining in the bottom – beat the egg whites with the salt, first on low speed for 30 seconds, then increase to high and continue beating until foamy and opaque. Add the vanilla then start adding the ½ cup sugar, a tablespoon at a time as you beat, until very stiff, glossy peaks form.

Assemble the Coffee Cakes: Line 2 baking/cookie sheets with parchment paper. Punch down the dough and divide in half. On a lightly floured surface, working one piece of the dough at a time (keep the other half of the dough wrapped in plastic), roll out the dough into a 20 x 10-inch (about 51 x 25 ½ cm) rectangle.

Spread half of the meringue evenly over the rectangle up to about 1/2-inch (3/4 cm) from the edges. Sprinkle half of your filling of choice evenly over the meringue (ex: half of the cinnamon-sugar followed by half the chopped nuts and half of the chocolate chips/chopped chocolate).

Now, roll up the dough jellyroll style, from the long side. Pinch the seam closed to seal. Very carefully transfer the filled log to one of the lined cookie sheets, seam side down. Bring the ends of the log around and seal the ends together, forming a ring, tucking one end into the other and pinching to seal.


Using kitchen scissors or a sharp knife (although scissors are easier), make cuts along the outside edge at 1-inch (2 ½ cm) intervals. Make them as shallow or as deep as desired but don’t be afraid to cut deep into the ring.

Repeat with the remaining dough, meringue and fillings. Cover the 2 coffee cakes with plastic wrap and allow them to rise again for 45 to 60 minutes. Preheat the oven to 350°F (180°C). Brush the tops of the coffee cakes with the egg wash. Bake in the preheated oven for 25 to 30 minutes until risen and golden brown.


The dough should sound hollow when tapped. Remove from the oven and slide the parchment paper off the cookie sheets onto the table. Very gently loosen the coffee cakes from the paper with a large spatula and carefully slide the cakes off onto cooling racks. Allow to cool. Just before serving, dust the tops of the coffee cakes with confectioner’s sugar as well as cocoa powder if using chocolate in the filling. These are best eaten fresh, the same day or the next day.


Look at how airy and the light the cake looks! Yeast works magic on the dough! All in all the result was just beautiful - well risen, baked to the right golden brown perfection...

March 21, 2011

Exciting new hobby!!


Hi All... I have a fun new exciting high- making birthday cakes!! Thanks to my friends Leslie and Sus, who trusted me enough to ask me to bake their daughters' birthday cakes! I had made a castle cake (made with 6 cakes) for my lil girl's birthday last year! I got very positive reviews after that but I wasn't bold enough to take any orders for the cake. But my friend Leslie thought that I should be able to make one for her lil girl who was turning 5 this month.


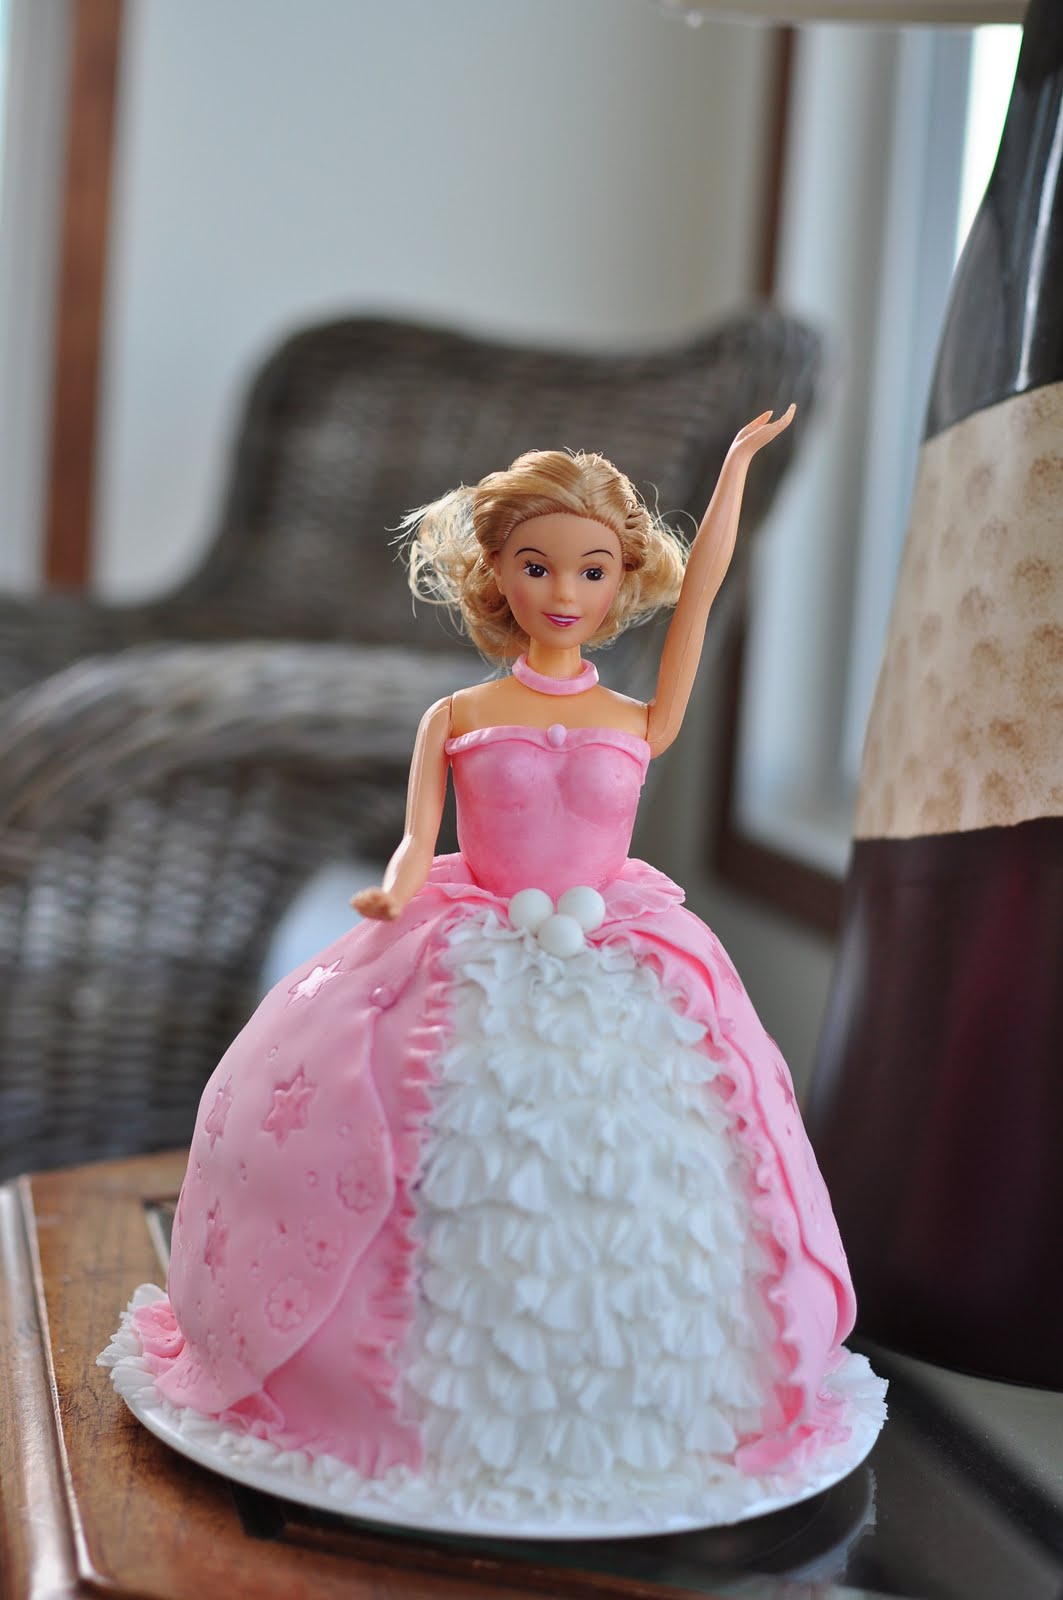
The first birthday girl wanted a princess with pink gown. I decided to do a yellow cake with strawberry preserves for the doll and a black forest cake with fondant (Wilton) covering to resemble a wrapped present, with the doll standing on top. The present cake was covered with a pastel pink fondant with bows, crullers and ribbon made out of white fondant. And thus my first ever doll and present cake was born! It turned out really well, and the guests were amazed and were kind enough to appreciate me!


The inspiration for the ruffled layers in the front of the doll came from a video of a cake on youtube and I searched for tutorials. Finally when I figured it out, I realised that it was a relatively easy and quick to master technique and yet gave breathtakingly beautiful and professional looking results!


For the crullers (fondant springs): Roll the fondant thin and make very thin long ribbons with a kinife. Drape the ribbon around the handle of a wooden spatula and allow to dry slightly. Slide the crullers off the handle gently and allow to harden completely.


I grew confident and I decided that I could accept a second cake order within a couple of weeks! Sus really liked pictures of the first cake and wanted a doll cake for her daughter too! But I changed the bottom of the second cake by covering it with buttercream (Wilton decorator's icing)icing with pink shells on the border and two toned roses.


The second doll was done pretty much similar to the first one except that the gown was of a slightly diferent pattern. I also tried using pearl dust (pink) on the gown and thats my new favorite cake decorating accessory!! The pearl dust gave such a beautiful sheen to the dress, I loved it! Its pretty easy to use - just mix with some vanilla extract and paint on! Pearls coated with shimmer dust also adorned the gown.


For the irrgeular green stringy leaves, pipe green tinted buttercream through a small round tip and allow to drop naturally on the cake. For two toned roses, apply gel coloring to the inside of the piping bag (on the narrow petal tip side of the bag). Pipe buttercream roses with icing tinted to a color lighter than the gel applied to the inside of the bag. I have sprinkled pink decoraring sugar on the cake. Also, put tiny drops of piping gel on the roses to resemble water drops.


Since I didnt take any pictures of how to make the ruffles during my first try, I took some this time. Hopefully someone else will find it useful! Please follow the basics of working with fondant - dust the work surface with confectioner's sugar, keeping the unused fondant covered. I did all my fondant work on a silpat mat.


Make crinkle cut outs from fondant. Cut the center of the cut outs using a smaller plain round cutter.


Take a tooth pick and press at the petal part of the cut out and roll it back and forth to thin out the area. Repeat through all the petals of the cut outs. Cut the ruffle ring along one petal and stretch to linearize.


Stick the ruffle to a crumb coated doll figurine. If attaching to a fondant covered surface, use little water to stick the ruffle to the fondant. I attached three of such ruffles to make the lowest layer of ruffle. Attach the second layer of ruffles overlapping the first (bottom). Repeat to cover the entire front of the doll. I did the next couple of layers with one ruffle each and then towards the top of the doll, one ruffle ring can be cut into two and stretched to make the top ruffle layers. Drape another layer of rolled fondant over the ruffles so as to cover the ends of the ruffles and make the gown.Decorate/punch designs on the drape before applying onto the cake.


I hand painted each star on the draped gown with the pearl dust, and also the ruffles. I am extremely happy with the results considering this is only my second doll cake!

I know I haven't covered everything in this post. So feel free to ask any questions that you might have, I would be happy to respond. Please do let me know your thoughts and suggestions on how I did!

Once again I am toasting to my new hobby! I just hope I would get enough time to be able to continue with it.... Cheers!!!

February 11, 2011

Layered Vanilla Panna Cotta and Florentine Cookies!

The February 2011 Daring Bakers’ challenge was hosted by Mallory from A Sofa in the Kitchen. She chose to challenge everyone to make Panna Cotta from a Giada De Laurentiis recipe and Nestle Florentine Cookies.

Unfortunately my computer broke recently (initially thought to be a virus but now it looks like a problem with the hard disk) and I dont have a quick access to any of my pictures! I am just heartbroken because I had put in a lot of effort into these layered pannacotta!! I am trying really hard to recover atleast some of my pictures! Lesson learned for not backing up stuff! Stay tuned and I will post them asap, if I am able to recover them!

UPDATE: I was able to get the pictures that I had posted on Daring Baker's forum. There were a lot of other pictures on my computer. I will try to recover them as soon as I get a chance.

VERDICT: This recipe for pannacotta is simply awesome!! I was not too excited when I first knew of the challenge, but this challenge resulted in such an awesome creamy smooth dessert, I fell in love with pannacotta all over again! The gelee that I made was using Pom Pomegranate-Blueberry juice and the tart gelee worked magic with the smooth creamy and dreamy pannacotta. You can work wonders with the presentation and will leave you satisfied with the results!

The florentine cookies were also amazing! Again, I was not too thrilled about oat cookies, but these were really delicious crisp cookies! The ease of prep work is also something to be mentioned! I will definitely make them again!


Giada's Vanilla Panna Cotta


Ingredients
1 cup (240 ml) whole milk
1 tablespoon (one packet) (15 ml) (7 gm) (¼ oz) unflavored powdered gelatin
3 cups (720 ml) whipping cream (30+% butterfat)
1/3 cup (80 ml) honey
1 tablespoon (15 ml) (15 gm) (½ oz) granulated sugar
pinch of salt

Directions:

1. Pour the milk into a bowl or pot and sprinkle gelatin evenly and thinly over the milk (make sure the bowl/pot is
cold by placing the bowl/pot in the refrigerator for a few minutes before you start making the Panna Cotta). Let
stand for 5 minutes to soften the gelatin.
2. Pour the milk into the saucepan/pot and place over medium heat on the stove. Heat this mixture until it is hot,
but not boiling, about five minutes. (I whisk it a few times at this stage).
3. Next, add the cream, honey, sugar, and pinch of salt. Making sure the mixture doesn't boil, continue to heat and
stir occasionally until the sugar and honey have dissolved 5-7 minutes.
4. Remove from heat, allow it to sit for a few minutes to cool slightly. Then pour into the glass or ramekin.
5. Refrigerate at least 6 hours or overnight. Add garnishes and serve.


Chocolate Panna Cotta:
Recipe adapted from Bon Appetit

Ingredients:
1 cup (240 ml) whole milk
1 tablespoon (15 ml) (7 gm) (¼ oz) unflavored powdered gelatin
2 cups (480 ml) whipping cream (30+% butterfat)
½ cup (115 gm) (4 oz) sugar
¾ cup (145 gm)(5 oz) bittersweet or semisweet chocolate
½ teaspoon (2½ ml) vanilla extract
Directions:
1. Pour milk into a small bowl, sprinkle gelatin over the top, set aside for 2-5 minutes.
2. Place a medium saucepan over medium heat, stir in cream, sugar and vanilla. Bring to a low boil.
3. Add chocolate and whisk until melted. Whisk the milk/gelatin mixture into chocolate cream mixture. Whisk until gelatin has dissolved.
4. Transfer to ramekins, or nice glasses for serving.
5. Cover and chill at least 8 hours, or overnight.


Nestle Florentine Cookies:
Recipe from the cookbook “Nestle Classic Recipes”, and their website.

Ingredients:

2/3 cup (160 ml) (150 gm) (5.3 oz) unsalted butter
2 cups (480 ml) (160 gm) (5 2/3 oz) quick oats
1 cup (240 ml) (230 gm) (8 oz) granulated sugar
2/3 cup (160 ml) (95 gm) (3⅓ oz) plain (all purpose) flour
1/3 cup (60 ml) dark corn syrup
1/4 cup (60 ml) whole milk
1 tsp (5 ml) vanilla extract
pinch of salt
1½ cups (360 ml) (250 gm) (9 oz) dark or milk chocolate

Directions:
Preheat oven to moderately hot 375°F (190°C) (gas mark 5). Prepare your baking sheet with silpat or parchment paper.
1. Melt butter in a medium saucepan, then remove from the heat.
2. To the melted butter add oats, sugar, flour, corn syrup, milk, vanilla, and salt. Mix well.
Drop a tablespoon full, three inches (75 mm) apart, onto your prepared baking sheet. Flatten slightly with the back of your tablespoon, or use a spatula.
3. Bake in preheated oven for 6-8 minutes, until cookies are golden brown. Cool completely on the baking sheets.
4. While the cookies are cooling melt your chocolate until smooth either in the microwave (1 1/2 minutes), or stovetop (in a double boiler, or a bowl that fits atop a saucepan filled with a bit of water, being sure the water doesn't touch the bottom of the bowl).
5. Peel the cookies from the silpat or parchment and place face down on a wire rack set over a sheet of wax/parchment paper (to keep counters clean).
6. Spread a tablespoon of chocolate on the bottom/flat side of your cookie, sandwiching another (flat end) cookie atop the chocolate.
This recipe will make about 2 1/2 - 3 dozen sandwiched Florentine cookies. You can also choose not to sandwich yours, in which case, drizzle the tops with chocolate (over your wax paper).


Coffee Gelée:
Adapted from this recipe in Gourmet Magazine

Ingredients:

2 cups (480 ml) good quality brewed coffee
1/4 cup (60 ml) hot water + 2 tablespoons (30 ml) cold water
1/2 cup (120 ml) (115 gm) (4 oz) granulated sugar
1½ teaspoons (7½ ml) (3½ gm) (1/8 oz) unflavored powdered gelatin
2 teaspoons (10 ml) vanilla extract

Directions:
1. Place granulated sugar and 1/4 c. hot water in a small saucepan. Bring to a boil, stir until the sugar has dissolved.
2. Sprinkle gelatin over 2 Tablespoons cold water and let it soften 2 minutes or so.
3. Stir the coffee, sugar, hot water, and vanilla into a small metal bowl, add gelatin mixture and stir well until gelatin has dissolved. If pouring over Panna Cotta, be sure that this mixture is no longer hot, it will melt Panna Cotta if it is, let it come to room temperature.


Fruit Gelée:
Recipe by Mallory

Ingredients:

1 cup (240 ml) (230 gm) (8 oz) fruit (strawberries, raspberries, mango, blackberry, etc.)
*Note: Certain fruits interact with gelatin and stop it gelling like pineapple and kiwi etc.
3 tablespoons (45 ml) water
1/4 cup (60 ml) (60 gm) (2 oz) granulated sugar
1½ teaspoons (7½ ml) (3½ gm) (1/8 oz) unflavored powdered gelatin

Directions:
1. Sprinkle gelatin over water.
2. Place fruit and sugar in a small saucepan and simmer until sugar has dissolved. Now mix the gelatin into the strawberry mixture and stir until gelatin has dissolved.
3. Remove from heat and allow to cool (close to room temp, again, if you're planning on layering on pouring on top of your Panna Cotta, a hot mixture will also heat up your chilled Panna Cotta).

February 10, 2011

Croquembouche - revisited!!


Remember this, everybody!? Croquembouche was the DB challenge for the month of June, 2010. It was such fun making it the first time and sharing it with a bunch of friends! I decided to make it again during the holidays last year as a thankyou gift when we went over to a friend's for a dinner party!


I thought I would post the new pictures that we took of my second successful try and inspire those who haven't tried this before! Hope the pictures are tempting enough to give them a try!

Unadorned, but I still think they are super pretty!

Stay tuned for the DB challenge for this month! Have a great week!

February 2, 2011

Appetizers galore - 3 different appetizers to spice up your party!


Good morning everyone!

I would like to share with you a few appetizers that I had tried for a couple of parties around my daughter's birthday time and Christmas! I came across these recipes on allrecipes.com and kraftrecipes.com and decided to give them a try since they had very high ratings and awesome reviews! I first made them for my lil one's birthday party! Eventhough we had a whole Indian dinner planned afterwards, I had to have a lot of appetizers for our guests (I love trying out new ones!)! So I chose the 7-layer dip, bacon wrapped smokies and cheesy spinach-artichoke dip as my three new try-outs, along with others like meatballs, peanuts, chips and salsa and so on! They were simple, easy and had our guests rave about how awesome they were! I had recipe requests from our guests!


The preparation of 7-layer dip went without a hitch, eventhough mine was more like a 4-layer dip! I did the taco seasoning-refried beans layer. the cream cheese-sour cream layer, a thin salsa layer and then the cheese layer with a few sliced olives on top. It tasted superb! Pair it with Tostitos Hint of Lime chips and mmmwah! One of the top favorites especially among our vegetarian friends!


The bacon-wrapped smokies needed a bit more effort - wrapping each cocktail sausage with a slice of bacon. I cut each strip of bacon into three so that I could wrap three sausages with one bacon strip. The first time I made them, I did the mistake of keeping them on flat sheets for baking. Of course, the bacon fat and sugar dripped down onto the oven base (which I actually didn't notice until later), and when I tried to bake my cheesy spinach artichoke dip, it starting smoking and the fire alarm went off! Our fire alarm says "FIRE FIRE!" when its beeping and after the nerve-wracking episode of calming my lil one and her friend down, I decided I would use slow cooker for my next try, whenever it is!

It wasnt long after, when I made it again for our Christmas party! I used a slow cooker and cooked it over 4 hours or so, but the liquid that came out was too much, and so my smokies were not as coated as when I made them in the ove. So word of advice, use a pan with sides and bake the smokies to perfection, definitely use foil to line the pan! Eventhough it was a bit messy, we all enjoyed it so much, it was the star appetizer of the party!


Because of my oven mishap with the smokies, I couldnt bake the cheesy spinach artichoke dip. I microwaved it for 10 minutes or so, but was never the same as if I had baked it. And it cooled down pretty quickly, so it didn't have the pulled cheese look, when dipped into! But other than that it was also pretty tasty!

So try these out and I am sure you wont be disappointed! Please do leave your comments and/or suggestions about the blog or the post or just say hi when you drop by!